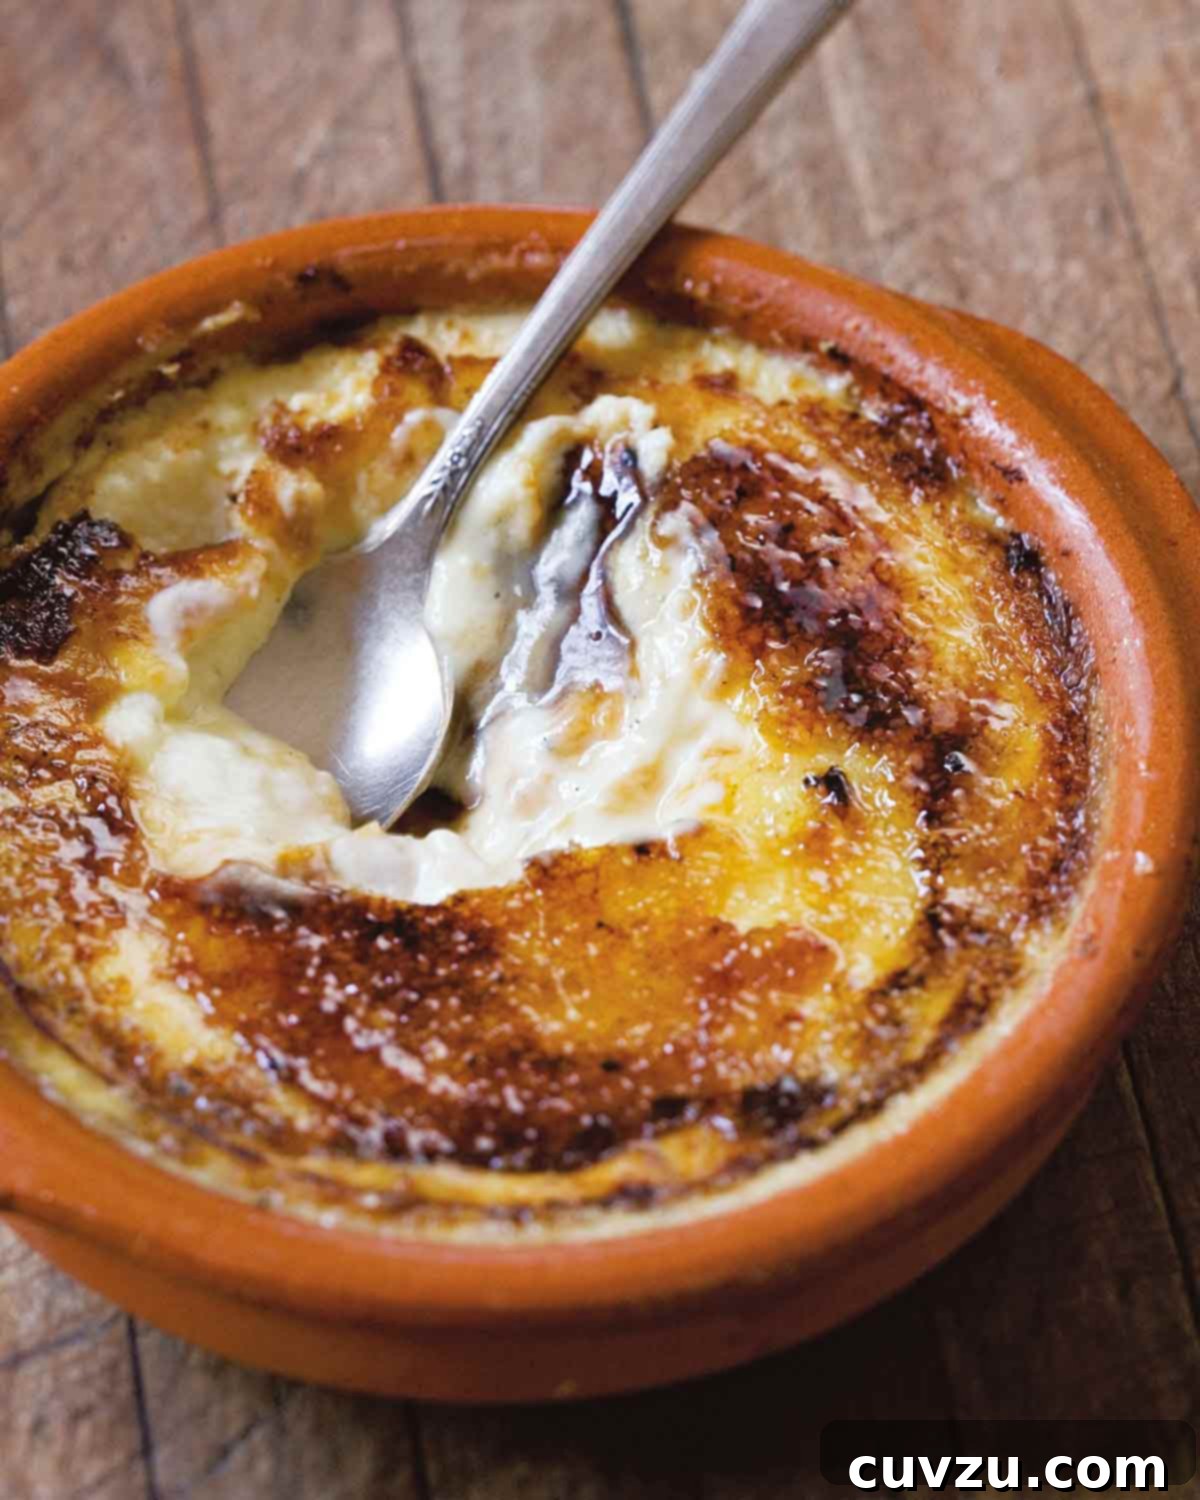
Crèma Catalana: The Ultimate Guide to Crafting Spain’s Iconic Custard
Delight in the rich culinary heritage of Catalonia with Crèma Catalana, a timeless Spanish dessert renowned for its silken texture and captivating caramelized sugar crust. Often likened to its French cousin, crème brûlée, this classic custard stands distinct with its unique preparation and vibrant lemon and vanilla-infused milk base. Prepare to embark on a delectable journey as we unveil the secrets to mastering this cherished stovetop-cooked delicacy, culminating in an irresistibly brittle, smoky caramel topping that promises a delightful crunch with every spoonful.
The Essence of Crèma Catalana: A Spanish Culinary Gem
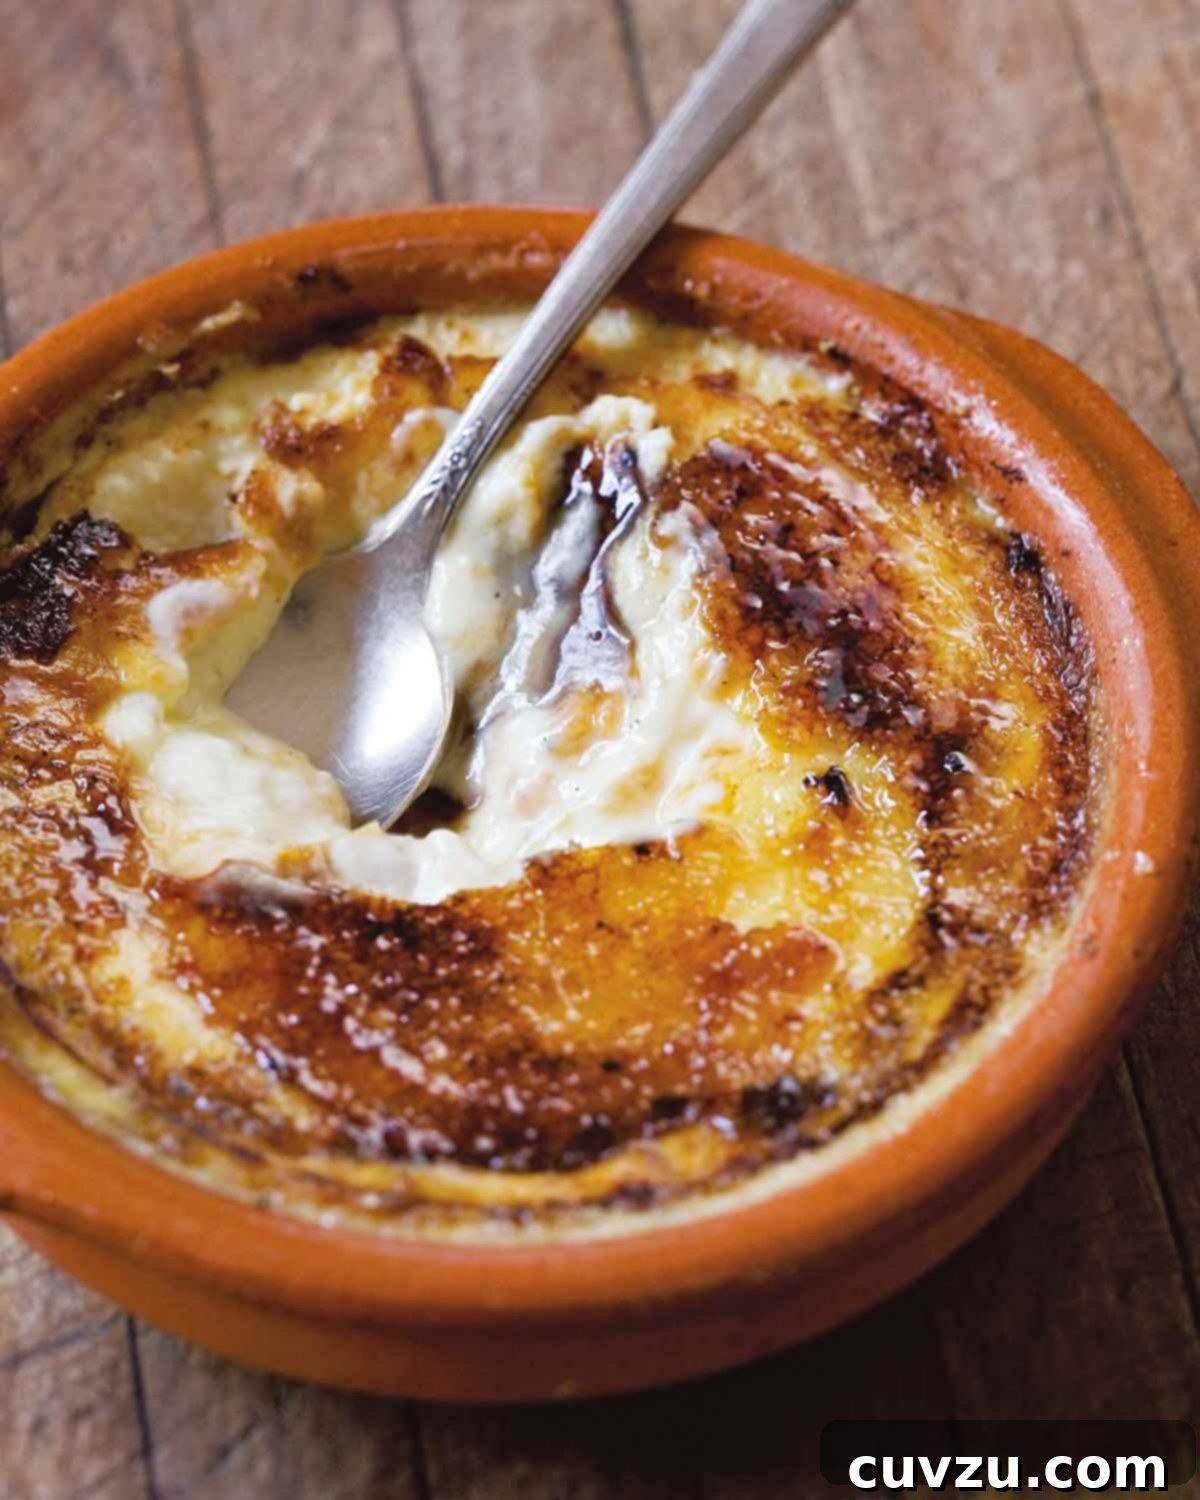
Crèma Catalana, known locally as “crema cremada” (burnt cream), isn’t just a dessert; it’s a profound expression of Catalonia’s rich culinary history and passion for flavor. This beloved treat perfectly balances creamy indulgence with a refreshing zest, making it a quintessential end to any authentic Spanish meal. Unlike many custards that rely solely on baking, Crèma Catalana traditionally begins its journey on the stovetop, achieving a luscious, thick consistency before being chilled. The true magic, however, lies in its signature caramelized sugar crust – a delicate, glass-like layer that shatters with the slightest tap of a spoon, releasing an enticing aroma of burnt sugar that is simply intoxicating.
Traditionally served in shallow, individual terra-cotta dishes known as cazuelitas, the presentation of Crèma Catalana is as inviting as its taste. The broad, shallow surface of these traditional dishes allows for a generous, perfectly thin caramel crust, which is absolutely pivotal to the dessert’s authentic experience. Achieving this golden, brittle layer traditionally involved a specially designed heated kitchen iron called a “salamander.” While a salamander might be a rarity in most home kitchens today, modern culinary tools like a kitchen blowtorch or even a high-heat broiler can help you recreate this iconic finish, ensuring that delicious burnt sugar taste and wonderful smoky aroma are present in every bite.
A Historical Twist: Unveiling the Dual Cooking Method
While many contemporary recipes simplify Crèma Catalana to a quick stovetop preparation followed by chilling, an intriguing historical variant, dating back over a century, incorporates an additional and vital step: a gentle bake in a slow oven. This “dual cooking” method is not merely a modern innovation but a return to time-honored techniques. Culinary experts like David Kinch, the acclaimed chef-owner of Manresa restaurant in Los Gatos, California, who previously honed his skills at the Catalan restaurant Sent Sovi, have affirmed its authenticity. Kinch noted that older Catalan culinary texts indeed suggest this two-stage cooking process, a practice that significantly elevates the dessert beyond its stovetop-only counterparts.
This traditional baking step is a subtle yet profoundly significant detail that enhances the custard’s texture, imbuing it with an unparalleled luxurious creaminess and depth of flavor. By baking the custard at a low temperature after its initial stovetop preparation, the eggs set more gently, resulting in a silkier, more uniform consistency throughout. It’s a testament to the meticulous craftsmanship and dedication to flavor that defines traditional Catalan cuisine, offering a richer, more satisfying mouthfeel that lingers long after the last bite, distinguishing it as a truly exceptional dessert.
Crème Brûlée vs. Crèma Catalana: A Culinary Showdown
The superficial similarities between Crèma Catalana and its more widely known French cousin, crème brûlée, often lead to confusion. However, these two beloved custards possess distinct characteristics that firmly set them apart, making each a unique culinary experience. As renowned culinary author Paula Wolfert eloquently highlights, the primary differences lie in their cooking method and fundamental base ingredients, which collectively result in unique flavor profiles and textural nuances.
- Cooking Method: Crème brûlée is famously baked in a bain-marie, or water bath. This gentle cooking environment ensures that the custard cooks evenly and slowly, resulting in a supremely smooth, almost jiggly interior. Crèma Catalana, conversely, is not baked in a water bath. The traditional dual-cooking method, as discussed, involves a careful stovetop preparation followed by a direct, slow oven bake. This direct heat application, without the insulating water bath, contributes to a slightly different, often firmer yet still luxuriously creamy texture that is characteristic of the Catalan version.
- Ingredients: Perhaps the most significant distinction lies in the dairy used. While crème brûlée traditionally relies on a rich, heavy cream base, Crèma Catalana is characteristically made with a lighter mixture, predominantly whole milk (sometimes with a touch of lighter cream). This choice of dairy significantly impacts the dessert’s overall richness and perceived lightness. The milk base of Crèma Catalana allows the bright, citrusy notes of lemon zest and the warm, comforting embrace of vanilla to shine through more distinctly, creating a refreshingly balanced flavor that feels less heavy and cloying than its cream-laden French counterpart. This combination of a unique cooking method and a lighter milk base gives Crèma Catalana its signature elegance, making it a dessert that is distinctly Catalan – vibrant, flavorful, and deeply rooted in local traditions.
Understanding these subtle yet crucial distinctions enhances one’s appreciation for both desserts, celebrating their individual culinary merits and the rich cultural stories they tell.
Crèma Catalana: The Authentic Recipe
Ready to create this exquisite Spanish dessert in your own kitchen? This recipe, championed by David Leite, guides you through each step to achieve a perfectly smooth custard with that irresistible burnt sugar topping. While the full culinary experience often requires a little patience and attention to detail, the rewards are immeasurable – a truly authentic taste of Catalonia.
Recipe at a Glance
- Author: David Leite
- Summary: A classic Spanish dessert featuring lemon and vanilla-infused milk, egg, and sugar, crowned with a crisp caramel crust.
- Course: Dessert
- Cuisine: Spanish
- Servings: 6 generous portions
- Calories: Approximately 252 kcal per serving
- Prep Time: 35 minutes
- Cook Time: 1 hour 25 minutes (includes stovetop cooking and gentle baking)
- Total Time: Approximately 2 hours (not including chilling time)
Essential Equipment for Perfect Crèma Catalana
- A 3-quart glazed or unglazed earthenware or ceramic flameware saucepan or casserole. If using an electric or ceramic stovetop, a heat diffuser is highly recommended to prevent scorching and ensure even heat distribution for the delicate custard.
- Six individual earthenware cazuelitas or very shallow porcelain or stoneware baking dishes, each about 6 ounces (170 g) capacity and approximately 5 inches (13 cm) in diameter. These shallow dishes are ideal for maximizing the surface area for achieving a perfect caramel crust.
- Standard kitchen tools: a sturdy whisk, several mixing bowls, accurate measuring cups and spoons, a fine-mesh sieve (optional, for an extra smooth custard), and a jelly roll pan or roasting pan for baking the individual dishes.
- For caramelizing the sugar: a kitchen blowtorch, an iron salamander (traditional), or a gas broiler.
Ingredients You’ll Need
- 1 quart (4 cups) whole milk
- 1 piece (2 inches) vanilla bean, split lengthwise (alternatively, 1.5 teaspoons good quality vanilla extract can be used, added at step 4)
- 1 long strip lemon zest, preferably organic (to avoid bitter pesticides and achieve a purer citrus flavor); ensure no white pith is included
- 1/2 cup egg yolks (this typically requires 7 or 8 large egg yolks)
- 1/4 cup plus 3 tablespoons granulated sugar
- 2 tablespoons cornstarch
- 6 tablespoons turbinado sugar (for caramelizing the topping, approximately 1 tablespoon per serving)
Step-by-Step Instructions
- Infuse the Milk: Pour the whole milk into your chosen earthenware saucepan. Scrape the tiny, aromatic seeds from the split vanilla bean directly into the milk, then add the empty pod as well. Incorporate the long strip of lemon zest. Place the saucepan over low heat and gradually increase the heat to medium-low. Cook gently until small bubbles begin to form around the edges of the pan, indicating it’s nearing a simmer but not yet boiling vigorously. This slow heating allows the flavors to meld beautifully without scorching the milk.
- Steep for Flavor: Remove the saucepan from the heat and allow the vanilla and lemon to steep in the warm milk for approximately 20 minutes. This crucial steeping period is essential for deepening the aromatic infusion, making your custard truly exceptional and rich in flavor.
- Prepare for Baking: While the milk is steeping, preheat your oven to a very low 210°F (99°C). This low temperature is vital for the gentle secondary bake, which contributes to the custard’s luxurious creaminess.
- Reheat and Strain: Return the infused milk to medium heat, warming it until it is hot but carefully ensuring it does not reach a rolling boil. Once hot, carefully scoop out and discard the vanilla pod and the lemon zest. If you desire an extra-smooth custard, you may strain the milk through a fine-mesh sieve at this point.
- Prepare the Egg Mixture: In a separate, medium-sized mixing bowl, combine the egg yolks, granulated sugar, and cornstarch. Whisk these ingredients vigorously and continuously until the mixture is completely smooth, wonderfully creamy, and noticeably pale yellow in color. This process typically takes 2 to 3 minutes and helps ensure a silky-smooth custard base free of lumps.
- Temper the Custard: Gradually whisk about 1 cup of the hot infused milk into the prepared egg yolk mixture. This “tempering” step slowly and gently raises the temperature of the egg yolks, preventing them from scrambling when they are fully combined with the rest of the hot milk. Once tempered, scrape the entire warm egg yolk mixture back into the remaining hot milk in the saucepan.
- Cook the Custard: Continue cooking the custard mixture over low heat, stirring constantly with a whisk or a wooden spoon. The custard will gradually thicken as it cooks. Continue stirring until it achieves a creamy consistency, thick enough to generously coat the back of a spoon. It is absolutely imperative not to allow the mixture to boil during this stage, as boiling will cause the eggs to curdle and ruin the smooth texture.
- Bake for Extra Creaminess: Arrange your cazuelitas or shallow baking dishes in a jelly roll pan or roasting pan to contain any potential spills and make transfer easier. Ladle the prepared custard evenly into each dish, filling them almost to the top. Transfer the pan to the preheated oven and bake for 1 to 1 1/4 hours. The custard is ready when it is set around the edges but still exhibits a slight, delicate jiggly motion in the center when gently shaken.
- Chill Thoroughly: Remove the custards from the oven and allow them to cool completely to room temperature on a wire rack. Once cooled, cover each individual dish tightly with plastic wrap and refrigerate for at least 4 hours, or preferably overnight, for optimal setting and flavor development. This chilling period is crucial for achieving the perfect creamy texture. The prepared custards can be stored in the refrigerator for up to 2 days.
- Caramelize and Serve: Approximately 20 minutes before serving, remove the chilled cazuelitas from the refrigerator and discard the plastic wrap. Using a paper towel, gently blot away any surface moisture that may have accumulated on the top of each custard; this step is essential for ensuring a perfect caramel crust. Sprinkle 1 tablespoon of turbinado sugar evenly over the surface of each custard, covering it completely. Proceed to caramelize the sugar using one of the three proven methods described in detail below. Serve immediately to fully enjoy the delightful contrast of the warm, brittle crust and the cool, creamy custard beneath.
Foolproof Strategies for Caramelizing Sugar: Mastering the Perfect Crust
The signature element of Crèma Catalana is its exquisite, crackling caramel crust – a brittle, amber layer that promises a satisfying crunch and a hint of smoky sweetness. Achieving this can feel daunting at first, but with the right tools and techniques, you’ll master it in no time. Here are three reliable methods to caramelize the turbinado sugar, each offering a slightly different approach but guaranteeing that essential, satisfying crunch.
1. The Traditional Way: Using an Iron Salamander
For purists seeking the most authentic results and a truly traditional flavor, an iron salamander (a small kitchen iron with a long handle, sometimes called a “brandier”) is the classic choice. This tool provides an intense, localized heat that creates a beautifully even, deeply flavored caramel with a unique smoky nuance.
- Heating the Salamander: Place the salamander directly over a high flame on a gas stovetop, on the highest-setting coil of an electric burner, or directly on a flat glass-topped electric stove. Allow it to heat thoroughly for a minimum of 5 minutes. You want it to be glowing slightly red for the best and quickest results, indicating it has reached an exceptionally high temperature.
- Caramelization Process: Work with one custard at a time. Carefully and swiftly apply the hot, rounded portion of the salamander directly to the turbinado sugar sprinkled on top of the chilled custard. Hold it steady, applying firm but gentle pressure, until you hear sizzling and observe the sugar rapidly smoking and transforming into a rich, dark amber color. The transformation should be quick.
- The Magic Reveal: The moment you lift the salamander, the molten sugar topping will instantly cool and solidify, transforming into a glossy, glassy, and brittle crust.
- Batch Processing & Cleaning: After each use, carefully wipe the salamander clean with a damp cloth (be extremely cautious, as it will be intensely hot!). Immediately return it to the heat for a few minutes to reheat before caramelizing the next custard. The beautiful glassy crust will retain its perfect texture for approximately 20 minutes, giving you ample time to finish all your servings before they lose their desired crispness. For thorough cleaning, allow the salamander to cool completely, then rinse it under hot water and scrub with a pumice stone or stiff brush until smooth. Rinse again and dry completely to prevent any rust.
2. The Modern Approach: Utilizing a Kitchen Blowtorch
A kitchen blowtorch is a popular, efficient, and versatile tool for caramelizing sugar. It offers precise control and consistently excellent results, making it a favorite for many home cooks.
- Ignition and Positioning: Always follow your blowtorch manufacturer’s instructions for safe ignition and handling. Hold the flame approximately 3 inches (about 7-8 cm) above the sugar topping. The key is to have the very tip of the flame just gently “kiss” or touch the sugar surface, rather than holding the flame too close.
- Even Caramelization: Employ a slow, steady, and continuous rotating motion, allowing the flame to “lick” the entire surface of the sugar. Keep the flame moving constantly to prevent burning in one isolated spot. Continue this motion until the sugar is evenly glazed and transforms into a deep, inviting golden-brown color. The even heat distribution from the blowtorch helps create a consistent, beautifully uniform crust.
- Safety Tip: Ensure you are working in a well-ventilated area when using a blowtorch and always keep it away from any flammable materials. Have a fire extinguisher or baking soda nearby as a precaution.
3. The Convenient Method: Under a Gas Broiler
For those without a specialized salamander or kitchen blowtorch, a gas broiler can serve as an effective alternative, though it demands vigilant monitoring due to its intensity.
- Preheating: Preheat your gas broiler to its highest setting. This intense, direct heat is crucial for achieving rapid caramelization.
- Broiling: Place the well-chilled custards (ensure they are very cold to minimize warming) on a sturdy baking sheet. Position the baking sheet about 5 inches (12-13 cm) directly below the broiler flame. Watch them *very* closely – sugar can burn in seconds. Broil until the sugar surface rapidly turns a deep, rich brown. The swift action of a gas broiler helps achieve quick caramelization without significantly warming the delicate custard beneath.
- Important Note for Electric Broilers: Using an electric broiler is generally *not recommended* for caramelizing Crèma Catalana. Electric broilers tend to heat more slowly and less intensely than gas broilers. By the time the sugar has properly caramelized under an electric broiler, the custards themselves are highly likely to have lost their desired chill, compromising the delightful hot-crust-cold-custard contrast that is essential to this dessert. If an electric broiler is your only available option, ensure your custards are as extremely well-chilled as possible, and attempt to broil for the absolute minimum time required, rotating the pan as needed for even browning.
No matter which method you choose, the ultimate goal is a perfectly brittle, dark amber crust that offers a satisfying crack and a harmonious blend of smoky sweetness, perfectly complementing the cool, creamy custard beneath. The contrast of textures and temperatures is what makes Crèma Catalana truly unforgettable.
What Our Recipe Testers Say: Real Experiences in the Kitchen
To ensure our recipes are not only delicious but also foolproof for home cooks, we entrust them to a panel of dedicated recipe testers. Here’s what they had to say about making this exquisite Crèma Catalana in their own kitchens, offering valuable insights and practical tips:

Trudy Ngo-Brown
“Oh my. This was fabulous and so simple to make,” raves Trudy Ngo-Brown. “A great dessert that’s rich in texture but not overly sweet.” Trudy found the recipe directions exceptionally clear and easy to follow, although she noted that her oven’s baking time extended slightly to just over 50 minutes, demonstrating that slight variations in oven calibration can occur. Lacking a specialized blowtorch for caramelization, she successfully utilized the broiler method as described in the notes. She candidly shared, “It was a little tricky to get an even browning, and some got a little too dark. However, it didn’t keep us from licking each ramekin clean! Can’t wait to make this again.” Trudy’s experience vividly highlights the overall ease of preparation and the utterly irresistible nature of this dessert, even when encountering minor challenges with the final caramelization step.

Deb Lynch
Deb Lynch echoed the sentiment of deliciousness, praising the dessert as “Delicious goodness with a hint of lemon and lovely vanilla flavor!” She particularly appreciated the background context provided by the author, noting that the recipe’s original call for specialty earthenware cookware (like cazuelitas and a flameware saucepan) stems from its adaptation from Paula Wolfert’s renowned clay pot cooking book. Deb, like many home cooks, did not possess these highly specialized tools or a traditional salamander. Instead, she successfully improvised, using a heavy-bottomed saucepan for the stovetop phase and individual 6-ounce shallow oven-safe glass dishes for both baking and caramelizing under her electric oven broiler.
Deb explicitly highlighted the appealing lightness of this Spanish version, stating, “I really appreciated the lightness of this Spanish version using milk as compared to the comparable very rich French crème brûlée.” This reinforces the distinctive characteristic of Crèma Catalana. She also offered a practical and crucial tip regarding the electric broiler: “The author advises against using an electric broiler to caramelize the sugar because the custard might warm up. If that’s the tool you have to remember to preheat the broiler and turn the pan as needed for even browning.” This valuable advice reinforces the caution provided in the recipe and offers a workable workaround for those with electric broilers, emphasizing the paramount importance of keeping the custards as chilled as possible to maintain that essential hot-crust-cold-custard contrast.
Additional Information
Adapted From
Purchase on Amazon
Nutrition Facts (per serving)
- Serving Size: 1 portion
- Calories: 252 kcal
- Carbohydrates: 31 g
- Protein: 8 g
- Fat: 11 g
- Saturated Fat: 5 g
- Monounsaturated Fat: 4 g
- Cholesterol: 235 mg
- Sodium: 78 mg
- Fiber: 1 g
- Sugar: 28 g
Disclaimer: Nutrition information is automatically calculated and should only be used as an approximation. Actual nutritional values may vary based on ingredients and preparation methods.
Share Your Crèma Catalana Creation!
Have you tried this classic Crèma Catalana recipe? We’d absolutely love to see your culinary masterpieces and hear about your experiences in the kitchen! Share your photos and stories with our vibrant community on social media.
Be sure to mention @leitesculinaria or tag your posts with #leitesculinaria! Your creations inspire us all.