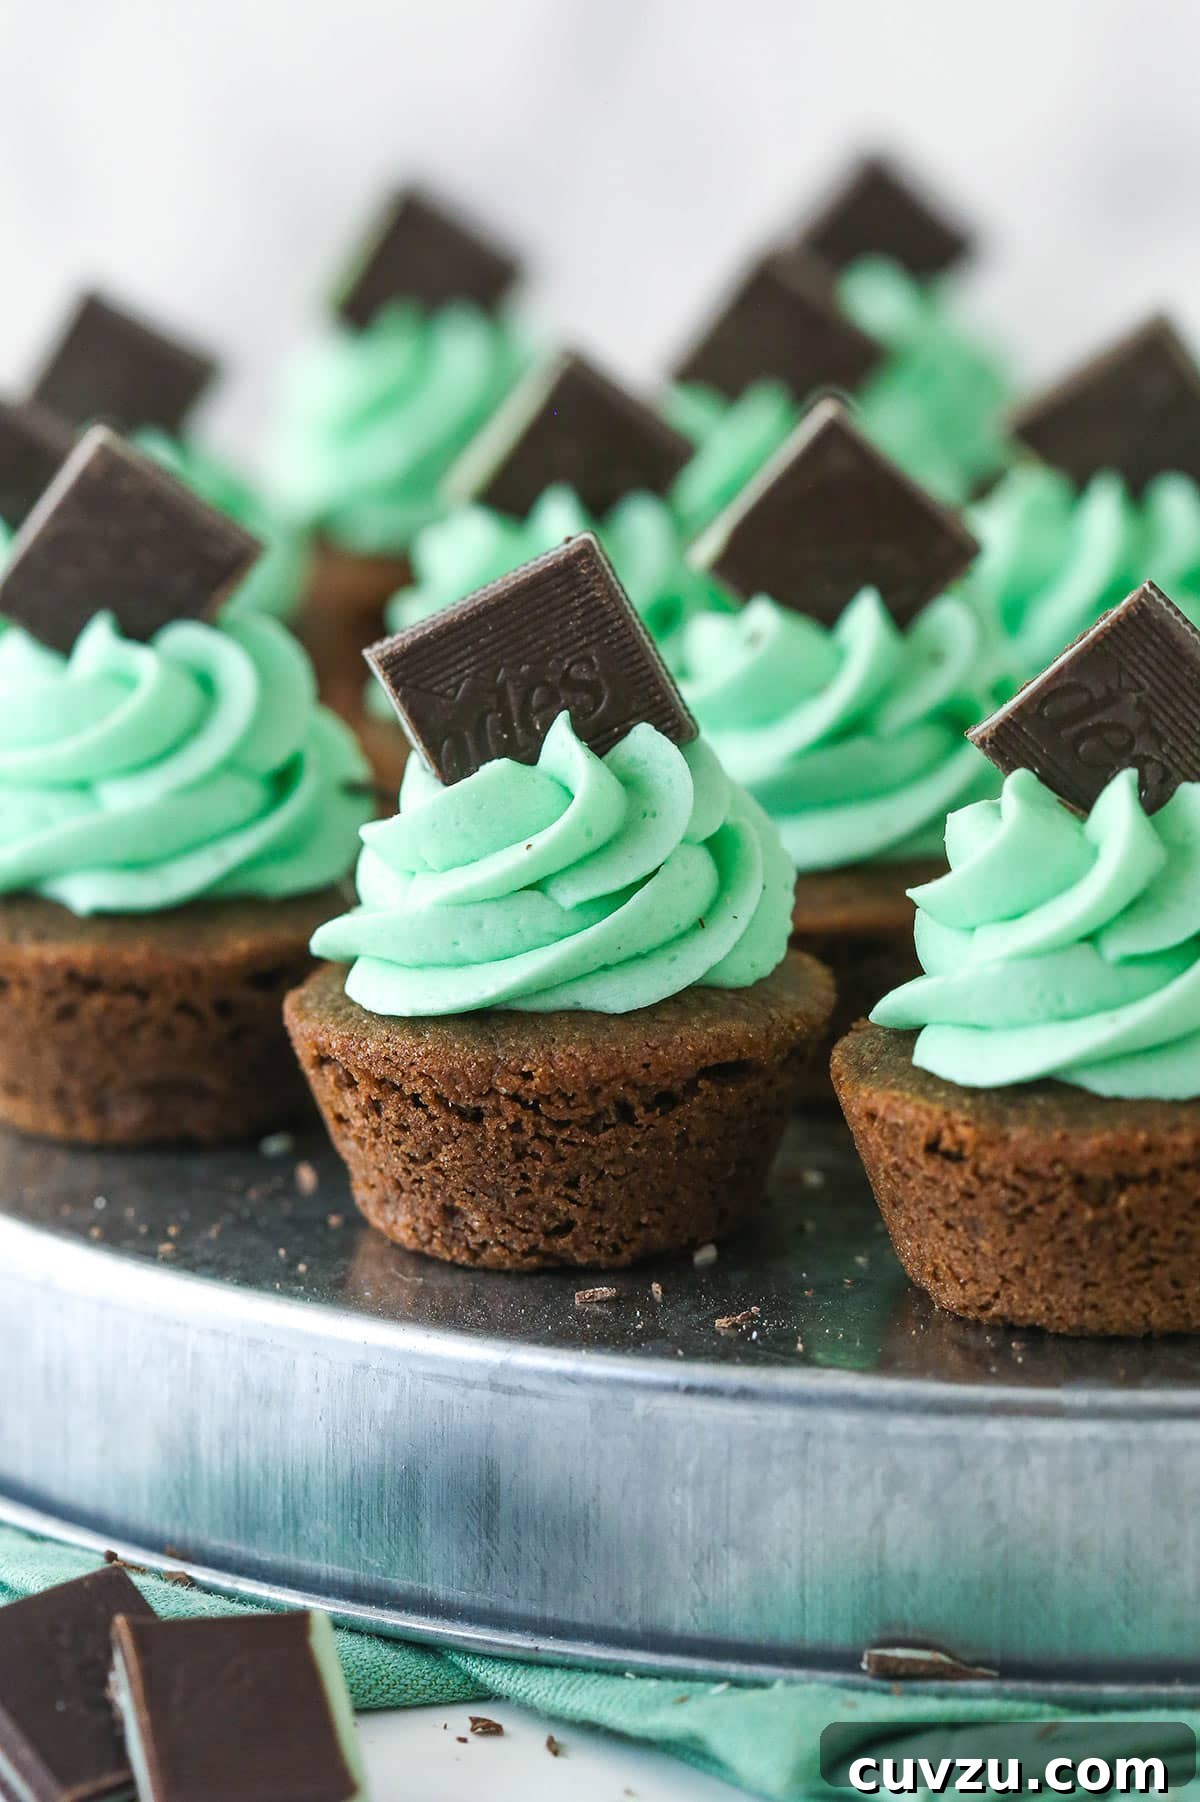
Indulge your senses with these utterly delightful Mint Chocolate Cookie Cups, a perfect harmony of rich chocolate and refreshing mint. Each bite-sized treat features a soft, fudgy chocolate cookie base, lovingly baked around a creamy, melting Andes Mint center, and crowned with a swirl of vibrant mint buttercream frosting. They are not just easy to bake, but also boast an irresistible allure that makes them disappear faster than you can say “delicious!”
Why These Andes Mint Chocolate Cookie Cups Are Simply Irresistible
If you’ve ever dreamt of a dessert that perfectly marries the classic combination of chocolate and mint in a convenient, utterly crave-worthy package, then your dreams have come true. These minty cookie cups are genuinely irresistible. The first batch I ever made vanished so quickly, I barely had a chance to savor their heavenly taste. Now, I know better: a double batch is always the starting point, as they’re guaranteed to disappear before my very eyes. But what makes them so utterly captivating? Let’s delve into their enchanting qualities.
- Perfectly Portioned & Bite-Sized Delight: First and foremost, these adorable treats are designed to be enjoyed in delightful, bite-sized portions. They are the ideal size for satisfying a sweet tooth without overwhelming you. However, in the spirit of full disclosure, I’ve yet to meet anyone who can stop at just one! Their compact nature also makes them perfect for parties, dessert platters, or a thoughtful gift.
- Rich, Fudgy, and Deeply Chocolatey: The foundation of these cookie cups is a marvel of chocolate perfection. I cannot emphasize enough the profound, rich chocolatey flavor that defines the cookie base. Each cup offers a delightful contrast: a slightly crisp edge gives way to an incredibly soft, fudgy center. It’s a texture combination that defines cookie cup excellence, making every mouthful a luxurious experience.
- Creamy, Melty Andes Mint Surprise: As a dedicated fan of Andes Mints, I can attest to their unique magic. There’s something truly special about their creamy texture and distinctive sweet minty flavor. In these cookie cups, an entire Andes Mint is cleverly tucked between the cookie and the luscious icing layer, creating a delightful surprise in the very heart of the dessert. As you sink your teeth into the cookie cup, a wave of warm, melting mint chocolate will flood your palate, creating an explosion of pure happiness.
- Decadent Mint Buttercream Topping: No cookie cup would be complete without a lavish topping, and these do not disappoint. Each chocolate mint cookie cup is crowned with a generous swirl of fluffy mint buttercream frosting, often finished with a delicate drizzle of chocolate sauce or an extra mint piece. This icing is so exquisitely good, I’d happily eat it by the spoon! The light, creamy frosting offers a perfect textural and flavor contrast to the dense, fudgy cookie and its hidden minty core, elevating the entire experience.
- Surprisingly Simple to Make: Despite their gourmet appearance and complex flavor profile, these Mint Chocolate Cookie Cups are remarkably straightforward to prepare. They utilize common baking ingredients and techniques, making them accessible even for novice bakers. The step-by-step process is intuitive and rewarding, leading to stunning results that will impress everyone.
If you consider yourself a true chocolate mint enthusiast, you absolutely must explore my other beloved recipes. Don’t miss out on my Andes Mint Cookies, the refreshingly creamy Mint Oreo Cheesecake, the grand Mint Chocolate Cake, and the adorable Mint Chocolate Chip Cupcakes!

Essential Ingredients for Your Mint Chocolate Cookie Cups
Crafting these heavenly Mint Chocolate Cookie Cups begins with selecting the right ingredients. Before you gather everything, take a moment to review these helpful tips for choosing the best components to ensure your cookie cups are nothing short of spectacular. For precise measurements, please refer to the detailed recipe card conveniently located further down this page.
For the Rich Chocolate Cookie Cups:
- Unsalted Butter: The cornerstone of any good cookie. Ensure your unsalted butter is at perfect room temperature before you begin. This is crucial for proper creaming with the sugars, resulting in a light and fluffy texture, which directly impacts the cookie’s final chewiness and tenderness.
- Granulated Sugar & Brown Sugar: This recipe employs a blend of both granulated white sugar and light brown sugar. Granulated sugar contributes to crispness and sweetness, while the brown sugar is key for adding extra moisture, a wonderfully chewy texture, and a subtle molasses-like depth of flavor that complements the chocolate beautifully.
- Milk: I highly recommend using 2% or whole milk. The fat content in these milks helps to tenderize the cookie dough, contributing to its rich taste and soft crumb. Avoid skim milk, as it may lead to a drier cookie.
- Large Egg: Use one large egg, always at room temperature. A room-temperature egg emulsifies better with the other ingredients, creating a smoother batter and a more cohesive, tender cookie.
- Vanilla Extract: A splash of pure vanilla extract is essential. It enhances the overall flavor profile of the chocolate, adding warmth and complexity without overpowering the star flavors of mint and chocolate.
- All-Purpose Flour: The structural backbone of your cookies. For the most consistent and accurate results, I strongly advise using a food scale to weigh your flour. If a scale isn’t available, employ the spoon and level method: gently spoon the flour into your measuring cup and then level it off with a straight edge. Over-measuring flour is a common pitfall that leads to dry, dense cookies, so precision here is paramount.
- Baking Soda: This leavening agent is vital for giving the cookie cups their characteristic rise and contributing to their wonderfully chewy texture. It reacts with the cocoa powder and brown sugar to create lightness.
- Natural Unsweetened Cocoa Powder: For an intense, deep chocolate flavor and a rich, appealing color, opt for natural unsweetened cocoa powder. Dutch-processed cocoa will yield a different flavor and color, so stick to natural for this recipe’s intended taste.
- Cornstarch: A secret weapon in many cookie recipes! A small amount of cornstarch tenderizes the cookie dough, resulting in a softer crumb, and crucially, helps the cookie cups maintain their distinct shape during baking, preventing excessive spreading.
- Andes Chocolate Mints: The star of the surprise center! I specifically recommend using Andes Chocolate Mints because I adore their unparalleled creamy texture and signature sweet minty flavor. Their quality and melt factor are ideal for embedding within these cookie cups.
For the Velvety Mint Buttercream Frosting:
- Unsalted Butter: Just like for the cookies, ensure your butter for the buttercream is at room temperature. This is absolutely essential for achieving a smooth, lump-free frosting that blends effortlessly. Cold butter will result in a clumpy, difficult-to-work-with frosting.
- Powdered Sugar (Confectioners’ Sugar): This finely milled sugar adds volume and the perfect amount of sweetness to your buttercream, creating a light and airy consistency. Sifting it beforehand can help prevent lumps.
- Mint & Vanilla Extracts: A thoughtful combination of mint extract and vanilla extract is key here. The vanilla extract helps to round out the mint flavor, preventing the buttercream from tasting overwhelmingly or artificially minty. It creates a balanced and more sophisticated flavor.
- Heavy Cream: Used to adjust the consistency of your frosting to your desired pipeable thickness. Start with a small amount and add more gradually until you reach the perfect, creamy consistency. Whole milk can also be used in a pinch.
- Green Gel Icing Color (Optional): Just a tiny drop of green gel food coloring will transform your buttercream into a beautiful pastel mint green, perfectly aligning with the festive theme of these cookie cups. Gel colors are concentrated, so use sparingly!
Step-by-Step Guide: How to Make Mint Chocolate Cookie Cups
Creating these delectable dessert cups is a straightforward and enjoyable process. Here, I’ll provide you with clear, step-by-step directions to give you a comprehensive overview of how to assemble them. For even more detailed instructions and specific quantities, please refer to the complete recipe card found at the bottom of this post.
Crafting the Chocolate Cookie Cups:
- Prepare for Baking: Begin by preheating your oven to 350°F (176°C). Thoroughly grease a mini muffin pan with baking spray or butter and flour. Ensuring each cup is well-greased is crucial for easy removal of your delicate cookie cups later.
- Combine Dry Ingredients: In a medium-sized bowl, whisk together the all-purpose flour, natural unsweetened cocoa powder, baking soda, cornstarch, and salt. Whisking ensures these ingredients are evenly distributed, leading to a consistent cookie texture. Set this bowl aside.
- Cream Butter and Sugars: In a large mixing bowl, using an electric mixer, cream together the room-temperature unsalted butter, granulated sugar, and packed light brown sugar. Beat on medium speed for 3-4 minutes, or until the mixture becomes visibly light in color and notably fluffy in texture. This step incorporates air, which is essential for a tender cookie.
- Add Egg and Vanilla: Scrape down the sides of the bowl. Add the room-temperature large egg and vanilla extract to the creamed mixture. Mix on medium speed until just combined and smooth, ensuring no streaks of egg remain.
- Incorporate Milk: Next, pour in the milk and mix until it is thoroughly incorporated into the batter. Adding the milk as a separate step after the egg and vanilla helps to ensure proper emulsification and prevents the batter from becoming too liquidy all at once, which could lead to separation.
- Gradually Add Dry Ingredients: With the mixer on low speed, gradually add the reserved dry ingredient mixture to the wet ingredients. Mix until just combined. Be careful not to overmix; overmixing can develop the gluten in the flour, leading to tough cookies. The resulting dough will be thick and rich.
- Form and Press Cookie Balls: Take approximately one tablespoon of cookie dough and roll it into a ball. Press one dough ball into the bottom of each mini muffin cup. Aim for each cup to be about three-quarters full. Gently press down the center of each dough portion with your thumb or the back of a small spoon to create a slight indentation. This divot is where your Andes Mint surprise will rest.
- Initial Bake & Mint Preparation: Transfer the muffin pan to the preheated oven and bake for 6-8 minutes. The cookies should appear slightly set around the edges but still a touch underdone in the very center – this is key to a fudgy cookie. While the cookies are baking, unwrap all your Andes Mints and break each one in half.
- Add the Andes Mints: As soon as the cookies come out of the oven, immediately press two halves of an Andes Mint (one whole mint, split) into the center of each warm cookie cup, right into the indentation you created. The residual heat from the cookies will begin to melt the mints, creating that luscious, gooey center.
- Cooling Process: Allow the cookie cups to cool in the muffin pan for 3-4 minutes. During this time, the mints will continue to melt and soften, and the cookies will set slightly. After this initial cooling, carefully remove the cookie cups from the pan using a small offset spatula or butter knife, and transfer them to a wire cooling rack to cool completely to room temperature. This is essential before frosting.
Whipping Up the Mint Buttercream Frosting:
- Beat the Butter: In a large mixer bowl, beat the room-temperature unsalted butter on medium-high speed until it becomes light, fluffy, and smooth, about 2-3 minutes. This aerates the butter, giving the buttercream its light texture.
- First Addition of Powdered Sugar: Add approximately half of the powdered sugar to the beaten butter. Start the mixer on low speed to avoid a cloud of sugar, then increase to medium-high and mix until the sugar is fully incorporated and the mixture is smooth.
- Flavor the Buttercream: Add the mint extract, vanilla extract, and one tablespoon of heavy cream to the mixture. Mix on medium speed until everything is well combined and smooth. The vanilla helps to balance the mint flavor.
- Remaining Powdered Sugar: Add the rest of the powdered sugar to the bowl. Again, start on low speed, then increase to medium-high, beating until the frosting is smooth and creamy.
- Adjust Consistency: If your buttercream seems too thick, add additional heavy cream, one tablespoon at a time, mixing after each addition, until you achieve your desired pipeable consistency. For a thicker frosting, you might need less; for a softer swirl, you might need a bit more.
- Color (Optional): If you desire a festive look, add just one drop of green gel icing color. Mix until the color is evenly distributed and your desired shade of mint green is achieved. Remember, gel colors are highly concentrated, so a little goes a long way.
- Frost and Decorate: Once the cookie cups are completely cooled, transfer the mint buttercream to a piping bag fitted with your favorite decorative tip (I often use an Ateco tip 844 for a beautiful swirl). Pipe a generous swirl of buttercream onto the top of each cookie cup. For an extra touch of elegance and flavor, garnish each frosted cookie cup with half an Andes Mint or a sprinkle of chocolate shavings.
- Storage: Store your finished Mint Chocolate Cookie Cups in an airtight container. They can be kept at room temperature for up to 24 hours, but beyond that, the buttercream will require refrigeration. For best enjoyment, allow refrigerated cookie cups to come back to room temperature before serving. They are best when consumed within 3-4 days.
Expert Tips for Mint Chocolate Cookie Cup Perfection
Achieving bakery-quality Mint Chocolate Cookie Cups is entirely within your reach with a few expert tips. Paying attention to these details will ensure your treats are consistently moist, perfectly flavored, and beautifully presented.
- Embrace Room-Temperature Ingredients: This tip is paramount for both the cookies and the buttercream. For the cookie dough, butter that is too cold won’t cream properly with the sugars, leading to a dense cookie. If it’s too warm, the dough might be greasy. For the buttercream, room-temperature butter ensures a silky-smooth, lump-free frosting. This consistency allows all ingredients to emulsify correctly, creating a superior texture.
- Grease Your Mini Muffin Pan Generously: Cookie cups can sometimes be a bit stubborn when it comes to removal from the pan. To avoid frustration and ensure perfectly intact cookie cups, make sure to thoroughly grease each cup of your mini muffin pan with baking spray or butter and a light dusting of flour. This crucial step guarantees easy release.
- Do Not Skimp on the Creaming Time: The creaming process of butter and sugars is more than just mixing; it’s about incorporating air into the mixture. This aeration provides lift and tenderness to your cookies. It typically takes several minutes for the sugar to fully dissolve and blend into the butter. Don’t stop until the mixture transforms, becoming visibly lighter in color and fluffier in texture. This visual cue indicates that it’s perfectly creamed.
- Precision in Flour Measurement is Key: Flour is a significant structural component, and incorrect measurement is a common culprit for baking mishaps. Too much flour will result in cookies that are overly dense, dry, and crumbly. I highly recommend using a food scale for the most accurate measurement by weight. Alternatively, master the spoon and level method: gently spoon flour into your measuring cup until overflowing, then level it off with a straight edge (like a butter knife) without compacting the flour.
- Allow Cookies to Cool Completely: Patience is a virtue when it comes to frosting. Resist the temptation to add that beautiful swirl of mint buttercream until your cookie cups have cooled entirely to room temperature. If the cookies are even slightly warm, the heat will cause the delicate buttercream to melt, slide off, and create a messy presentation.
- Don’t Overbake the Cookies: For that perfect fudgy center, it’s vital not to overbake your cookie cups. They should appear just set around the edges, and the very center might still look slightly soft or underdone when you pull them from the oven. They will continue to cook and set as they cool in the hot muffin pan. Overbaking will lead to dry, hard cookies.
- Quality of Mints Matters: While other mint chocolate candies might seem appealing, Andes Mints are specifically chosen for this recipe due to their unique smooth, creamy texture and perfect meltability. They integrate beautifully into the warm cookie cup to create that signature surprise center.
Storage and Freezing Information for Your Cookie Cups
Proper storage is key to maintaining the freshness and deliciousness of your Mint Chocolate Cookie Cups. Whether you plan to enjoy them immediately or save some for later, here’s how to keep them at their best.
- Refrigeration: Unfrosted cookie cups can be stored at room temperature in an airtight container for up to 2 days. However, once frosted with the mint buttercream, they are best kept at room temperature for no more than 24 hours. After that, due to the dairy in the buttercream, it’s essential to store the cookie cups in the refrigerator. Arrange them in a single layer within an airtight container, or separate layers with parchment paper if stacking. Seal the container tightly and refrigerate for up to 4 days. For optimal flavor and texture, allow them to come back to room temperature for about 15-30 minutes before serving.
- Freezing for Long-Term Enjoyment:
- Unfrosted: To freeze unfrosted cookie cups, simply wrap each individual cookie tightly in a layer of plastic wrap, then place them in a freezer-safe zip-top bag or an airtight container. They can be frozen for up to 3 months. Thaw them in the refrigerator overnight or at room temperature for a few hours before frosting and serving.
- Frosted: If you wish to freeze the cookie cups with the buttercream already applied, a “flash freezing” step is recommended to preserve the frosting’s integrity. Place the frosted cookie cups on a baking sheet lined with parchment paper, ensuring they don’t touch, and freeze for about an hour, or until the buttercream is firm to the touch. Once firm, individually wrap each cookie cup tightly in plastic wrap, then transfer them to a freezer-safe container or bag. Enjoy frozen cookies within 3 months of making them. To serve, unwrap each one and thaw in the refrigerator for several hours or overnight. Allow them to come to room temperature for the best texture and flavor before indulging.
Frequently Asked Questions (FAQ) About Mint Chocolate Cookie Cups
Here are answers to some common questions that arise when baking these delectable Mint Chocolate Cookie Cups, helping you achieve perfect results every time.
- Can I use a different type of mint chocolate candy? While Andes Mints are specifically recommended for their creamy texture and perfect melt, you could experiment with other mint chocolate squares or small peppermint patties. Be aware that the flavor and melt consistency might differ slightly.
- Can I make these cookie cups ahead of time? Absolutely! The cookie bases can be baked and stored unfrosted at room temperature in an airtight container for up to 2 days, or frozen for up to 3 months. The buttercream can also be made ahead and stored in the refrigerator for up to a week. Just bring it to room temperature and re-whip before piping. Assemble and frost the cookie cups closer to serving time for the freshest taste and appearance.
- What if my buttercream is too thick or too thin? Buttercream consistency is easily adjustable! If it’s too thick, add heavy cream (or milk) one teaspoon at a time, mixing well after each addition until desired consistency is reached. If it’s too thin, add more sifted powdered sugar, one tablespoon at a time, mixing until it thickens.
- Can I use a regular-sized muffin tin instead of mini? Yes, you can. However, you will need to adjust the baking time and the yield. Regular-sized cookie cups will require more dough per cup and a longer baking time (likely 10-14 minutes), and you will yield fewer cookie cups overall. Ensure the Andes Mints are appropriately sized or use two whole mints for a larger cup.
- How do I get perfectly round cookie cups? Greasing your mini muffin tin thoroughly is the first step. When pressing the dough into the cups, try to make it as even as possible around the sides. After baking and pressing in the mints, if some edges look a little uneven, you can gently reshape them slightly with the back of a spoon while they are still warm in the pan.
Creative Variations & Customizations for Your Mint Chocolate Cookie Cups
While these Mint Chocolate Cookie Cups are spectacular as is, don’t hesitate to get creative! Here are a few ideas to customize them and make them uniquely yours:
- Chocolate Drizzle: For an extra layer of chocolatey goodness, melt some semi-sweet or dark chocolate and drizzle it decoratively over the mint buttercream. This adds both visual appeal and a heightened chocolate flavor.
- Sprinkle Magic: Before the buttercream sets, adorn your cookie cups with festive sprinkles! Green, white, or chocolate sprinkles would be particularly charming for a holiday or themed event.
- Different Mint Candies: While Andes Mints are classic, you could try other small, thin chocolate mints or even small peppermint patties for a different texture and intensity of mint flavor. Just ensure they melt well within the warm cookie.
- White Chocolate Chips: Fold a handful of white chocolate chips into the cookie dough for an added layer of sweetness and visual contrast. They’ll melt slightly, creating pockets of creamy white chocolate within the dark cookie.
- Espresso Powder Boost: A tiny bit of espresso powder (1/2 teaspoon) added to the dry ingredients for the cookie dough can deepen the chocolate flavor without making it taste like coffee. It’s a chef’s secret for enhancing chocolate.
Discover More Irresistible Cookie Cup Recipes
Now that you’ve experienced the sheer ease and undeniable deliciousness of these Mint Chocolate Cookie Cups, I wholeheartedly encourage you to explore my other incredible cookie cup creations. Each recipe offers its own unique twist and is designed to be equally captivating and simple to prepare!
- Caramel Apple Cookie Cups
- Dirt Cookie Cups
- Fruit Cheesecake Sugar Cookie Cups
- Boston Cream Pie Cookie Cups
- Turtle Chocolate Cookie Cups
- Nutella Cheesecake Chocolate Cookie Cups
Mint Chocolate Cookie Cups
No reviews
- Author: Lindsay
- Prep Time: 45 minutes
- Cook Time: 8 minutes
- Total Time: 53 minutes
- Yield: 45 cookie cups
- Category: Dessert
- Method: Oven
- Cuisine: American
Description
These Mint Chocolate Cookie Cups are little bites of heaven. A soft chocolate cookie with an Andes Mint stuffed in the middle is topped with mint buttercream. They are easy to make and irresistibly good!
Ingredients
Chocolate Cookie Cups
- 2 1/2 cups (325g) all-purpose flour
- 1/4 cup (29g) natural unsweetened cocoa powder
- 1 tsp baking soda
- 1 tsp cornstarch
- 1/4 tsp salt
- 3/4 cups (168g) unsalted butter, room temperature
- 1/2 cup (104g) sugar
- 1/2 cup (112g) packed light brown sugar
- 1 large egg, room temperature
- 1/2 tsp vanilla extract
- 1/4 cup (60ml) milk
- 45 Andes Mints
Mint Buttercream Frosting
- 1/2 cup (112g) unsalted butter, room temperature
- 2 cups (230g) powdered sugar
- 1/2 tsp mint extract
- 1/2 tsp vanilla extract
- 1–2 tbsp heavy cream
- 1 drop green gel icing color, optional
- 23 Andes Mints, optional (for decorating)
Instructions
Cookie Cups:
- Preheat oven to 350°F (176°C) and grease a mini muffin tin with baking spray.
- Combine the flour, cocoa powder, baking soda, cornstarch and salt in a medium sized bowl and set aside.
- Cream the butter and sugars together in a large mixer bowl on medium speed until light in color and fluffy, 2-3 minutes.
- Add the egg and vanilla extract and mix until well combined.
- Add the milk and mix until well combined.
- Add the dry ingredients and mix until well combined.
- Make balls one tablespoon in size and press into the bottom of each mini muffin cup. Each cup should be about 3/4 full. Press the center of the dough down just a bit to make an indention, where you’ll add the Andes Mints later.
- Bake for 6-8 minutes or until the cookies are just a touch underdone in the center. Don’t over bake. While cookies are baking, unwrap the Andes Mints for the cookie cups and break them in half.
- Remove cookies from the oven (the centers may look a little undone, but they will cook more as they sit).
- Immediately press two halves of an Andes Mint into the center of each of the cookie cups. Allow to cool for 3-4 minutes in the muffin pan. The mints will start to melt.
- Remove cookies to a cooling rack to finish cooling.
Mint Buttercream:
- To make the buttercream, beat the butter in a large mixer bowl until smooth.
- Add about half of the powdered sugar and mix until well combined and smooth.
- Add the mint extract, vanilla extract and one tablespoon of heavy cream and mix until well combined and smooth.
- Add the remaining powdered sugar and mix until well combined and smooth.
- Add additional heavy cream until the buttercream is the right consistency.
- Add the gel icing color until your desired shade has been reached.
- Pipe the buttercream onto the cooled cookie cups. I used Ateco tip 844. Top each cookie with half a mint, if desired.
- Store cookie cups in an air-tight container. They can be stored at room temperature for up to 24 hours, but then the buttercream will need to be refrigerated. Serve at room temperature. Cookie cups are best if eaten within 3-4 days.
Notes
You’ll need two 4.6 oz packages of Andes Mints to have enough for inside the cookie cups (approx. 45 mints total). You may also need a third package if you plan to decorate all 45 cookie cups with half a mint on top (approx. 23 mints for topping).
Nutrition
- Serving Size: 1 Cookie Cup
- Calories: 176
- Sugar: 16.3 g
- Sodium: 61.8 mg
- Fat: 7.6 g
- Carbohydrates: 25.7 g
- Protein: 1.6 g
- Cholesterol: 17 mg