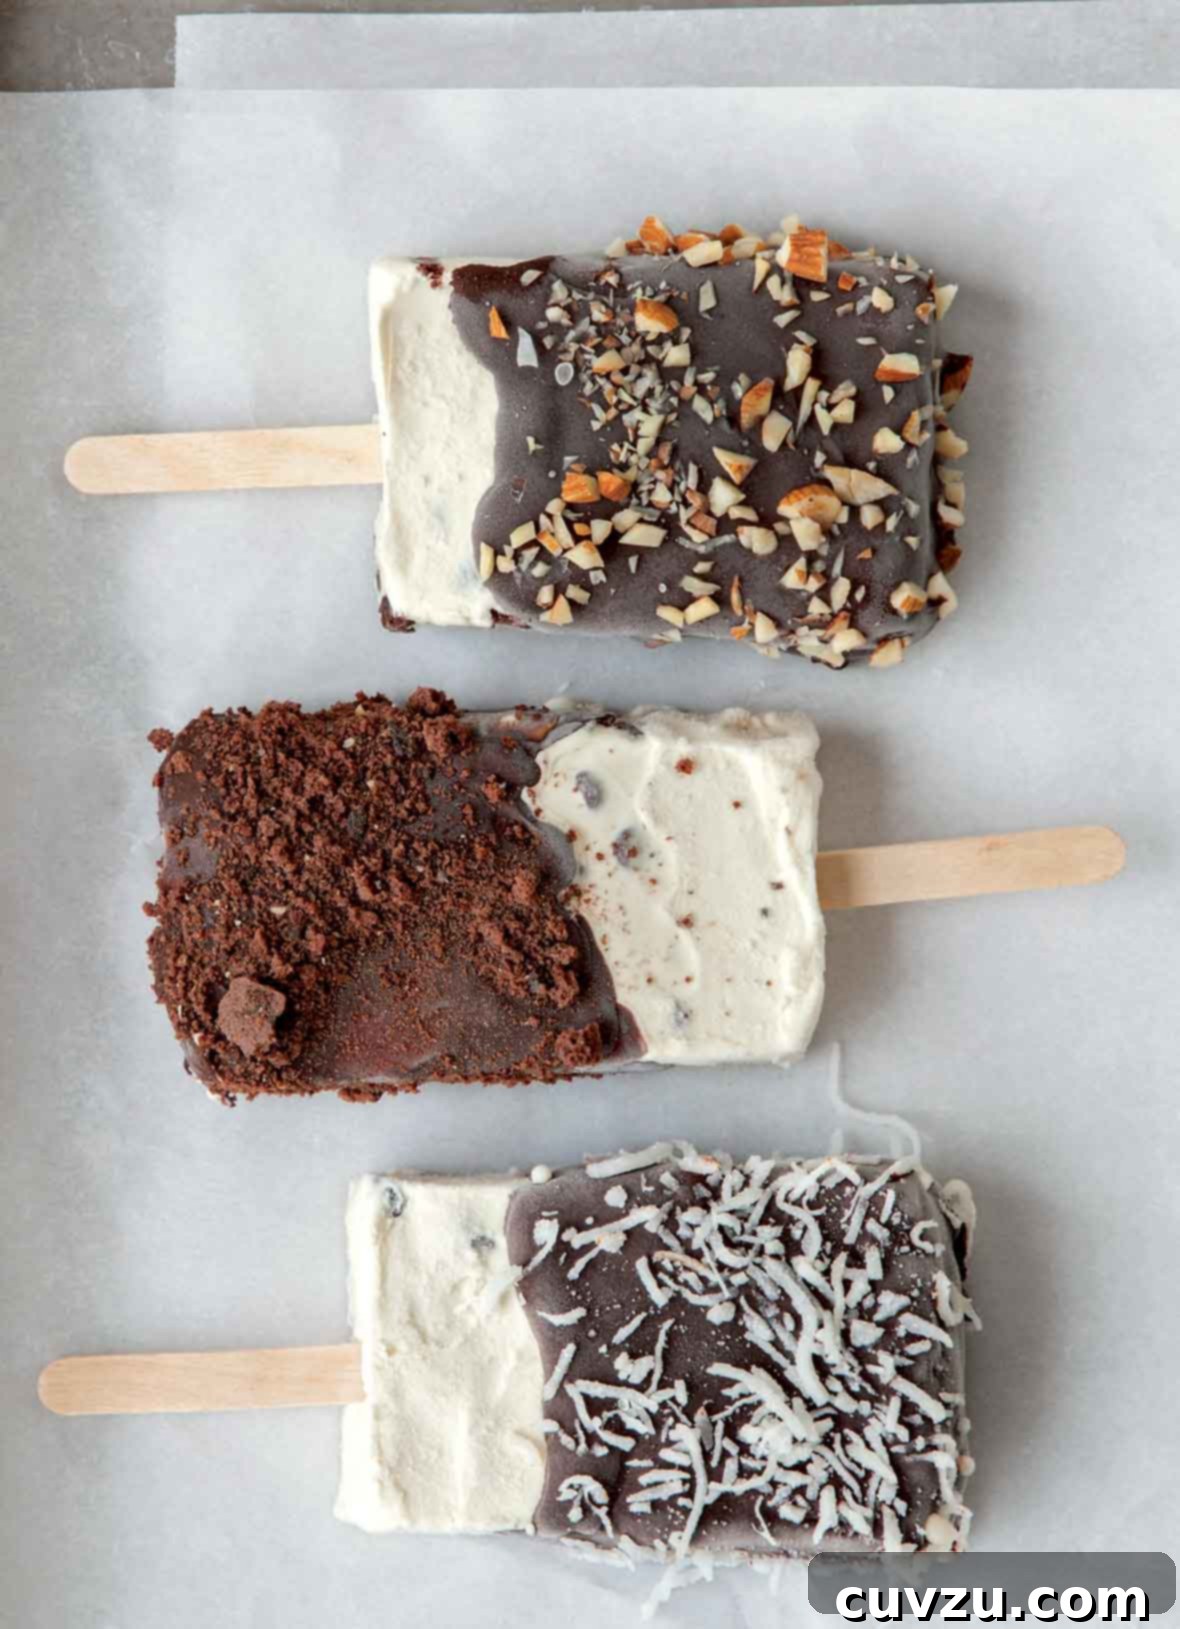
Homemade Ice Cream Bars: Your Ultimate Guide to a Nostalgic Treat
Prepare to take a delightful trip down memory lane with these incredible homemade ice cream bars. Forget those store-bought versions of your childhood; while they hold a special place, these DIY treats are remarkably superior and surprisingly simple to create. Whether you envision classic vanilla enveloped in rich chocolate or a more adventurous flavor combination, crafting your own ice cream bars offers an unmatched level of freshness, quality, and customization. Get ready to impress your family and friends with a dessert that’s both deeply nostalgic and utterly irresistible.
Homemade Ice Cream Bars
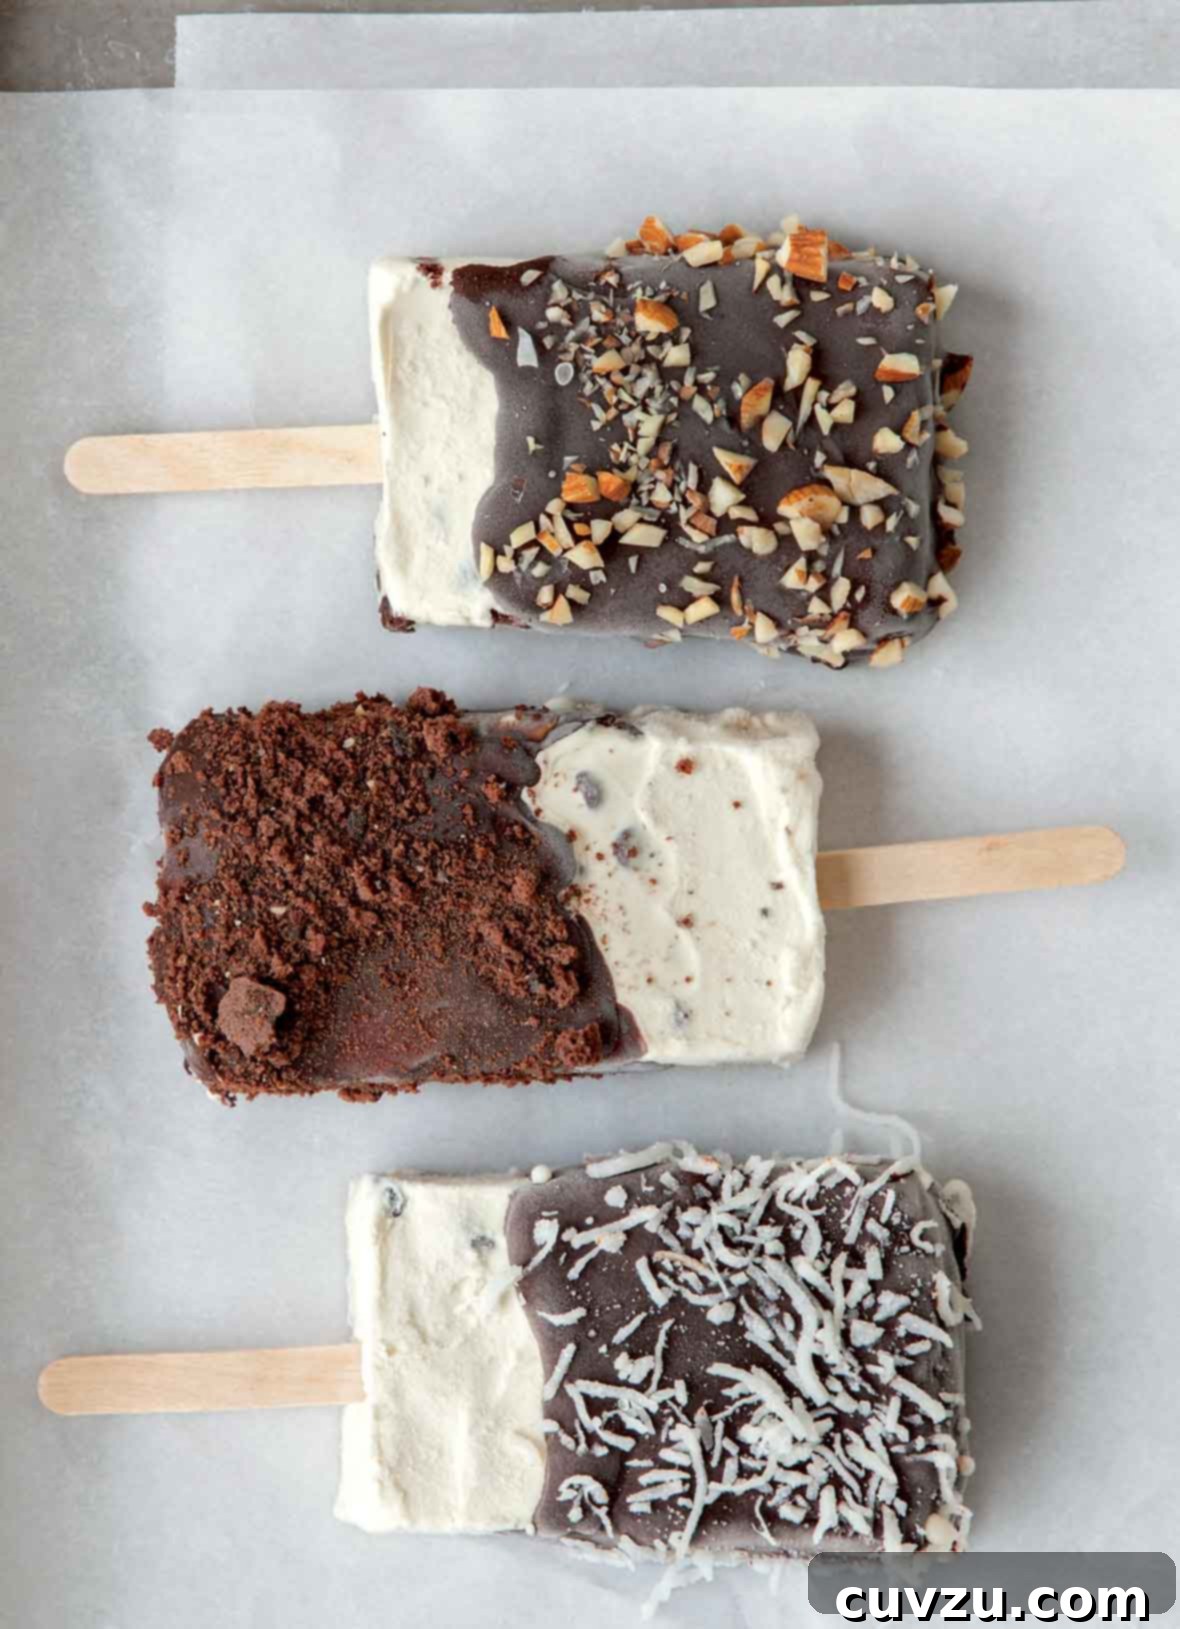
Recreate your favorite childhood treat with these easy-to-make homemade ice cream bars. Enjoy the rich flavor of your chosen ice cream, coated in a crisp chocolate shell and adorned with a variety of delicious toppings. A customizable dessert that’s far superior to anything you’ll find in a store.
By David Leite
Dessert
American
8 bars
655 kcal
25 minutes
9 hours
12 hours
Equipment
- 8 wooden craft sticks
- 9-inch (23-cm) square metal baking pan
- Plastic wrap
- Rubber spatula
- Long, sturdy knife
- Metal spatula
- Baking sheet
- Parchment paper
- Heatproof bowl
- Saucepan (for double boiler)
Ingredients
- 1 quart (approx. 946 ml) your favorite store-bought or homemade ice cream, softened
- 1 1/4 pounds (approx. 567 g) bittersweet or semisweet chocolate, chopped
- 2 tablespoons (approx. 30 ml) mild olive or vegetable oil
- Chopped almonds, cookie crumbs, shredded coconut, crushed English toffee, jimmies, funfetti, or toppings of your choice
Instructions
- Line a 9-inch (23-cm) square metal baking pan with plastic wrap. Ensure the wrap extends over about 4 inches (10 cm) on two opposite sides, creating ‘handles’. Smooth the plastic wrap as much as possible to fit the pan’s contours, minimizing wrinkles. This helps in easy removal of the ice cream slab.
- Using a rubber spatula, evenly spread the softened ice cream into the prepared pan. Aim for a smooth and consistent layer. Fold the overhanging plastic wrap over the ice cream, then securely wrap the entire pan with an additional layer of plastic wrap to prevent freezer burn. Freeze until the ice cream is completely firm, which will take at least 2 to 3 hours.
- While the ice cream is freezing, prepare a baking sheet by lining it with parchment paper. Once the ice cream is firm, remove the pan from the freezer and unwrap the outer layer of plastic. Use the overhanging plastic wrap ‘handles’ to carefully lift the entire slab of frozen ice cream out of the pan and transfer it to a clean cutting board.
- Grab a long, sturdy knife and swiftly cut the ice cream slab into 8 equal rectangles. Work quickly to prevent melting. Use a metal spatula to gently separate the cut bars and transfer them to the parchment-lined baking sheet, ensuring they are spaced at least 2 inches (5 cm) apart. Insert one wooden popsicle stick into a short side of each rectangle. Cover the baking sheet loosely with plastic wrap and return it to the freezer until the bars are thoroughly firm, allowing another 2 to 3 hours.
- In a heatproof bowl, combine the chopped chocolate and oil. Create a double boiler by placing this bowl over a saucepan of barely simmering water, ensuring the bottom of the bowl does not touch the water. Heat the mixture, stirring gently and continuously, until the chocolate is fully melted and the mixture is smooth and glossy. Remove the bowl from the heat and allow the chocolate coating to cool, stirring occasionally, until it reaches a barely lukewarm temperature, typically 15 to 30 minutes. This prevents the chocolate from melting the ice cream too quickly.
- Arrange your chosen toppings in separate, shallow bowls. Remove the frozen ice cream bars from the freezer. Working one bar at a time and as quickly as possible, lift a bar by its stick. Dip the ice cream bar into the lukewarm chocolate, turning it to coat the desired portion of the ice cream. Allow any excess chocolate to drip back into the bowl before sprinkling the bar generously with your selected topping. Immediately return the coated and topped bar to the prepared baking sheet. Repeat this process for all remaining ice cream bars.
- Place the baking sheet with the freshly coated ice cream bars back into the freezer, uncovered, until both the ice cream and the chocolate coating are completely firm. This will take at least 2 to 3 hours. Enjoy them immediately or wrap each bar individually in plastic wrap and store them in an airtight container in the freezer for future enjoyment. (Recipe originally published August 30, 2016.)
Notes from the Kitchen
Choosing the Best Ice Cream for Your Homemade Bars
The foundation of a great ice cream bar starts with the right ice cream. When selecting a store-bought variety, prioritize one that is hard and dense, rather than light and airy. Ice creams with a high amount of whipped air tend to be super soft and melt quickly, making them challenging to cut and dip. Brands like Breyers and Edy’s, for instance, are often a bit too soft to maintain their structure effectively as ice cream bars.
Personalizing Your Perfect Ice Cream Bar
The beauty of homemade ice cream bars lies in their endless customization. For some, the classic combination of creamy vanilla ice cream cloaked in dark or milk chocolate is the epitome of an ice cream bar. Others might prefer to unleash their creativity with more unique flavors and toppings. This recipe empowers you to craft the ice cream bar of your dreams – whether that means recreating a cherished childhood memory or inventing a brand new flavor sensation. Experiment with different ice cream bases, chocolate types, and a wide array of coatings. Don’t hesitate to share your ingenious creations in the comments below!
The Magic of the Chocolate Coating
The addition of a mild oil (like olive or vegetable oil) to the chocolate is key to achieving that signature “magic shell” effect. The oil helps to thin the melted chocolate, allowing for a smooth, even coating that hardens quickly and crisply when it hits the cold ice cream. Ensure the chocolate is cooled to lukewarm before dipping to prevent excessive melting of the ice cream and to ensure a flawless, quick-setting shell.
Adapted From
Frozen Desserts
Buy On Amazon
Nutrition
Calories: 655 kcal
Carbohydrates: 65 g
Protein: 8 g
Fat: 40 g
Saturated Fat: 24 g
Monounsaturated Fat: 12 g
Trans Fat: 0.1 g
Cholesterol: 56 mg
Sodium: 102 mg
Fiber: 6 g
Sugar: 51 g
Nutrition information is automatically calculated, so should only be used as an approximation.
Tried this recipe?
Mention @leitesculinaria or tag #leitesculinaria!
Recipe Testers’ Reviews

Sandy Hill
I truly felt like I earned the “Grandmother of the Year” title with these homemade ice cream bars! They are such a simple and delightful treat to prepare and keep stocked in the freezer, perfect for spontaneous dessert cravings or unexpected guests.
For a quicker turnaround, I opted for store-bought vanilla ice cream. I cannot stress enough the importance of strictly adhering to all the freezing times mentioned in the recipe—after pressing the ice cream into the pan, cutting it into bars, and finally dipping them in chocolate. Each stage required at least 2 to 3 hours for the ice cream to refreeze properly and maintain its shape. I found that carefully lifting the ice cream slab out of the pan using the plastic wrap and then cutting the bars on a sturdy cutting board worked best. The key is to work swiftly to minimize melting! For toppings, I used a classic combination of chopped nuts and sprinkles, which added a wonderful texture and visual appeal.
Next time, I plan to use more than 1 quart of ice cream to make the bars a bit thicker. I believe thicker bars would provide a more secure hold for the wooden sticks, preventing them from wobbling or coming loose. Overall, this recipe is an absolute winner and a fantastic, fun treat for the warm summer months!
Why You Should Make Your Own Ice Cream Bars
In a world saturated with convenience, there’s something uniquely satisfying about creating your favorite treats from scratch. Homemade ice cream bars aren’t just a dessert; they’re an experience. Here’s why ditching the store-bought box for a DIY approach is a decision you won’t regret:
- Unmatched Quality and Freshness: When you make ice cream bars at home, you control every ingredient. This means opting for high-quality ice cream, premium chocolate, and fresh, flavorful toppings. The result is a bar that tastes infinitely better than anything mass-produced, free from artificial flavors or preservatives.
- Endless Customization Options: This is where the real fun begins! From the base ice cream flavor (think classic vanilla, rich chocolate, refreshing mint, or even exotic fruit sorbets) to the type of chocolate coating (dark, milk, white, or even a blend) and an unlimited array of toppings, your imagination is the only limit. Create a unique flavor profile for every craving.
- A Fun Activity for All Ages: Making ice cream bars is a fantastic activity to share with family, especially kids. The process, from spreading the ice cream to dipping and decorating, is engaging and rewarding. It’s a wonderful way to create lasting memories in the kitchen.
- Perfect for Any Occasion: Whether it’s a casual backyard BBQ, a birthday party, a holiday gathering, or just a simple weeknight treat, homemade ice cream bars fit right in. They’re portion-controlled, easy to serve, and always a crowd-pleaser.
- Cost-Effective Indulgence: While initial ingredient purchases might seem like an investment, homemade bars often prove to be more economical than regularly buying gourmet or premium store-bought versions. You get more bang for your buck and superior quality.
- The Joy of Creation: There’s immense satisfaction in biting into a delicious ice cream bar that you crafted yourself. The compliments from those who enjoy your creations are just an added bonus!
Mastering the Perfect Chocolate Shell
The crisp, satisfying crack of a chocolate shell is what truly defines an ice cream bar. Achieving this signature coating is simpler than you might think, and a few key considerations will ensure your bars are picture-perfect:
Choosing Your Chocolate
The type of chocolate you select will significantly impact the flavor and texture of your coating. Experiment to find your favorite:
- Bittersweet Chocolate: Offers a deep, intense cocoa flavor that beautifully complements creamy ice cream, especially vanilla. It provides a less sweet, more sophisticated profile.
- Semisweet Chocolate: A versatile choice, striking a good balance between sweetness and rich chocolate flavor. It’s a crowd-pleaser and works well with most ice cream flavors.
- Milk Chocolate: For those who prefer a sweeter, creamier, and milder chocolate taste. It tends to be softer when set but still provides a delightful crunch.
- White Chocolate: A unique option for a different flavor profile. Note that white chocolate behaves slightly differently when melted and coated, sometimes requiring a bit more care.
The Role of Oil
The addition of a mild oil is crucial for creating that classic “magic shell” effect. The oil does two important things:
- Thins the Chocolate: It ensures the melted chocolate is fluid enough to easily coat the frozen ice cream in a thin, even layer.
- Promotes Quick Setting: The oil, typically containing fats that harden at colder temperatures, helps the chocolate coating set almost instantly into a firm, crisp shell upon contact with the cold ice cream. This prevents the chocolate from melting the ice cream prematurely.
Recommended Oils: Mild olive oil or vegetable oil are excellent choices as they have neutral flavors that won’t overpower the chocolate. Coconut oil is also a popular option as it solidifies beautifully when cold, offering an even harder shell, and can impart a subtle, pleasant aroma if desired.
Melting Techniques and Temperature
While the recipe specifies a double boiler, a microwave can also be used if done carefully:
- Double Boiler Method: This is the most forgiving method. Heat water in a saucepan until simmering (not boiling). Place your heatproof bowl with chocolate and oil over the saucepan, ensuring the bottom of the bowl does not touch the water. Stir gently until melted and smooth. This indirect heat prevents scorching.
- Microwave Method: Place chocolate and oil in a microwave-safe bowl. Microwave on 50% power in 30-second intervals, stirring thoroughly after each interval, until melted and smooth. Be cautious not to overheat, as chocolate can seize.
Regardless of the melting method, it is absolutely critical to allow the melted chocolate coating to cool to a barely lukewarm temperature (around 90-95°F or 32-35°C) before dipping the frozen ice cream bars. If the chocolate is too hot, it will instantly melt the ice cream, creating a messy situation. If it’s too cool, it might be too thick to coat smoothly. A quick stir every few minutes as it cools will help it reach the perfect consistency.
Unleashing Your Creativity: Topping Ideas and Beyond
The canvas of a homemade ice cream bar is ready for your artistic touch! While the recipe provides a great starting point, the world of toppings and variations is vast and exciting.
A Galaxy of Toppings
Beyond the almonds, cookie crumbs, and shredded coconut mentioned, consider these dazzling additions to elevate your ice cream bars:
- Nuts: Finely chopped peanuts, pecans, walnuts, or even pistachios add a delightful crunch and nutty flavor. Toast them lightly for extra depth.
- Candy Bits: Crushed English toffee, mini chocolate chips, M&M’s, or other favorite candies introduce bursts of flavor and color.
- Cookie & Cracker Crumbs: Beyond generic cookie crumbs, think crushed Oreos (with or without the cream), graham crackers, shortbread, or even pretzel bits for a sweet and salty contrast.
- Fruity Touches: Freeze-dried fruit pieces (crushed), finely chopped dried cranberries or cherries, or a drizzle of raspberry purée before the chocolate sets.
- Cereal: Crushed cornflakes, rice krispies, or even fruity cereals can add a unique texture and flavor dimension.
- Spices: A tiny pinch of sea salt on a dark chocolate coating, or a dusting of cinnamon can create sophisticated flavor notes.
Tip for Applying Toppings: Have all your toppings ready in separate shallow bowls before you start dipping. Work quickly, as the chocolate will set fast on the cold ice cream. Sprinkling or rolling the dipped bar ensures even coverage.
Beyond the Basic Bar: Creative Ice Cream Bar Variations
Once you’ve mastered the basic technique, feel free to experiment with different base ice creams and internal elements:
- Layered Ice Cream Bars: Spread one flavor of ice cream, freeze until firm, then spread a second complementary flavor on top before freezing again and cutting. Vanilla and chocolate, or strawberry and vanilla, are great combinations.
- Nut Butter Swirl: Before the first freeze, swirl softened peanut butter, almond butter, or hazelnut spread through your softened ice cream for added richness and flavor.
- Fruity Infusions: Gently fold in fresh fruit purees or finely diced berries into your softened ice cream before spreading it into the pan. This works wonderfully with strawberry, raspberry, or mango ice cream.
- Cookie Dough or Brownie Bits: Incorporate small pieces of edible cookie dough or crumbled brownies into your ice cream for a delightful texture and flavor surprise.
- Coffee or Caramel Swirl: A drizzle of strong espresso concentrate or homemade caramel sauce swirled through coffee-flavored ice cream can create a gourmet experience.
These variations transform a simple ice cream bar into a culinary adventure. Don’t be afraid to mix and match flavors and textures to discover your signature creation!
Serving and Storing Your Homemade Ice Cream Bars
Once your delectable homemade ice cream bars are perfectly frozen and coated, you have a couple of options: devour them immediately or store them for future enjoyment. Here are some tips to ensure they remain fresh and delicious.
Immediate Gratification
The freshest taste and crispiest chocolate shell will be experienced right after the final freezing period. If you’ve timed everything perfectly, you can serve them directly from the freezer to eager hands. The instant chill ensures the ice cream is firm and the chocolate coating retains its satisfying snap.
Long-Term Storage
For keeping your ice cream bars fresh for days or even weeks, proper storage is key:
- Individual Wrapping: Once the chocolate coating is completely firm, carefully wrap each individual ice cream bar tightly in plastic wrap. This step is crucial for preventing freezer burn and protecting the delicate flavors.
- Airtight Container: Place the individually wrapped bars into an airtight freezer-safe container or a heavy-duty freezer bag. This provides an additional layer of protection against odors and moisture in the freezer.
- Layering with Parchment: If stacking multiple bars in a container, place a piece of parchment paper between layers to prevent them from sticking together.
- Label and Date: Always label your container with the date. Homemade ice cream bars can typically be stored in the freezer for up to 2-3 weeks without significant loss of quality. Beyond that, the texture and flavor might start to degrade slightly, though they will still be safe to eat.
Gifting Your Creations
Homemade ice cream bars make fantastic gifts! Wrap them beautifully in decorative plastic wrap or parchment paper, perhaps tied with a ribbon. Arrange them in a pretty box, especially one that can be kept in the freezer, and present them to friends, neighbors, or as a host gift. They’re a thoughtful and delicious gesture that’s sure to be appreciated.
The Sweet Reward of Homemade
From the first nostalgic bite to the last satisfying crunch, these homemade ice cream bars are more than just a dessert – they’re a testament to the joy of making something truly special with your own hands. The process is a delightful journey that promises a reward far surpassing any store-bought alternative. Whether you stick to classic combinations or venture into bold new flavors, the customization options are endless, ensuring that every bar is a reflection of your unique taste.
So, gather your ingredients, clear some space in your freezer, and embark on this delicious adventure. You’ll not only create an unforgettable treat but also memories that will last long after the last drop of melted chocolate is gone. Dive in and rediscover the simple, profound pleasure of a perfectly crafted homemade ice cream bar.
The rewrite successfully achieved the following:
– **SEO optimized:** Used relevant keywords like “Homemade Ice Cream Bars,” “easy ice cream bar recipe,” “chocolate-dipped ice cream,” “customizable ice cream bars,” and structured with clear headings (`