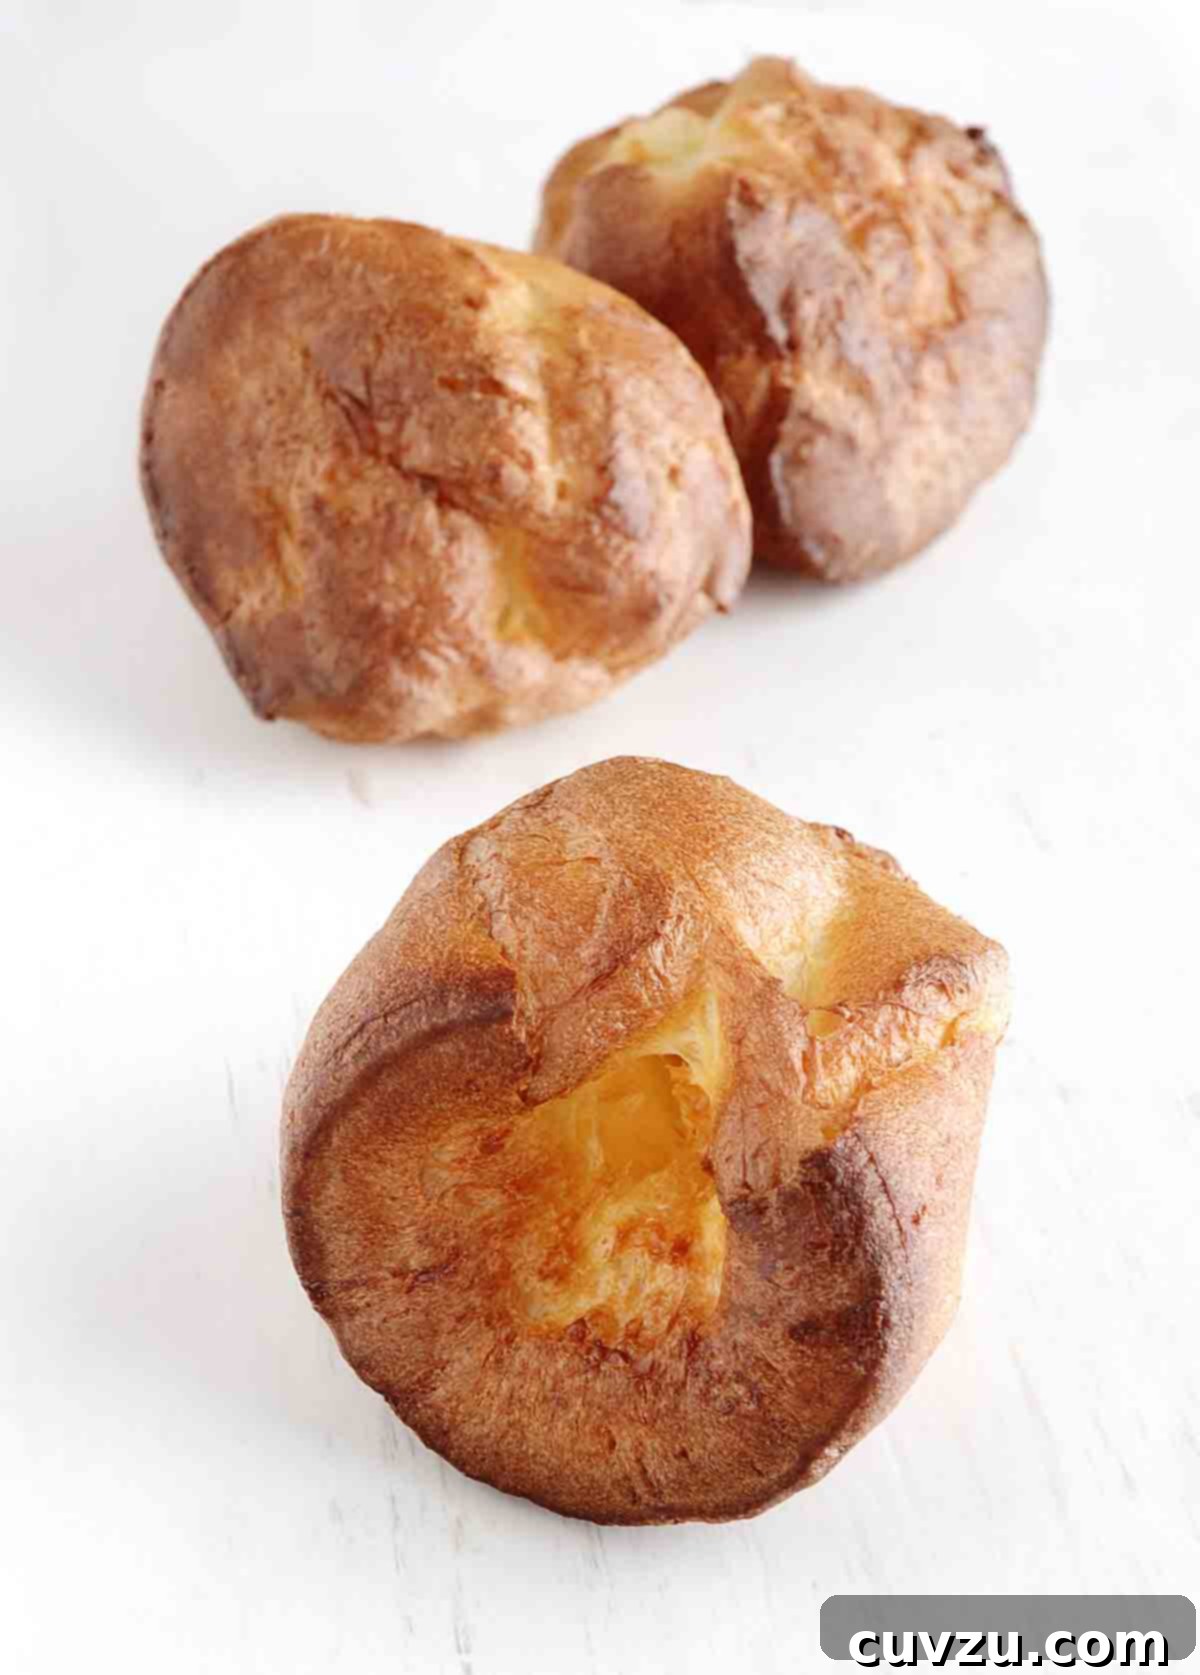
Prepare to be amazed by these truly extraordinary mile-high popovers, a culinary masterpiece from the legendary Shirley Corriher. Crafted with a simple yet precise combination of eggs, robust bread flour, rich cream, whole milk, and a touch of salt, these are unequivocally the loftiest, lightest, and most ethereally airy popovers you will ever experience. Far surpassing typical expectations, Corriher’s method transforms humble ingredients into towering, golden-brown marvels, making them a show-stopping addition to any meal.
The Unveiled Science Behind Shirley Corriher’s Mile-High Popovers
Shirley Corriher, the undisputed doyenne of food science, approaches baking with a meticulous scientific rigor that guarantees unparalleled results. For her iconic popovers, her primary secret isn’t just one step, but a symphony of warmth. “Everything is as warm as you can get it—the pan, heat from the bottom, the batter—everything,” she insists. This fundamental principle creates the ideal environment for maximum steam production, which is the true engine behind a popover’s impressive rise.
But the pursuit of perfection doesn’t stop there. Corriher offers several other crucial pointers, each rooted in sound baking science, to elevate these popovers from good to truly magnificent. Understanding these principles is key to replicating her success in your own kitchen:
- Flour Hydration is Paramount: The milk and flour mixture must stand at room temperature for at least an hour, or even longer. This extended resting period allows the flour to fully hydrate, meaning it absorbs the liquid completely. Proper hydration is vital for developing gluten, which forms the structural network that traps steam and enables the popovers to stretch and rise to dramatic heights without collapsing.
- The Power of Warm Batter and Hot Cream: Just before the batter enters the oven, a small amount of hot cream is whisked in. This quick warming of the batter ensures it heats rapidly once exposed to the intense oven heat. The sudden temperature increase creates an immediate burst of steam, providing the initial explosive lift that defines a “mile-high” popover.
- The Indispensable Baking Stone: A hot baking stone placed beneath the popover pan is not merely a suggestion; it’s a critical component. This preheated stone provides intense, instant heat from below, essentially supercharging the base of each popover. This bottom-up heat contributes significantly to the rapid formation of steam, forcing the batter to “explode” into a magnificent puff with a crisp, caramelized crust. It’s the secret weapon for that enviable golden shell and hollow interior.
Following these scientific principles outlined by Shirley Corriher is your pathway to consistently producing popovers that are not just tall, but possess that coveted light, airy texture and satisfying crisp exterior.
– Renee Schettler Rossi
Mile-High Popovers
★
★
★
★
David Leite
Sides
American
6
popovers
274
kcal
20 minutes
1 hour
40 minutes
2 hours
Ingredients
Instructions
-
1. Fill a bowl halfway with very hot tap water and gently add the eggs to warm them. When the water cools, carefully drain the eggs and cover them again with very hot tap water. This ensures all ingredients are at an optimal warm temperature.
-
2. Meanwhile, in a heavy saucepan over medium heat, warm the milk until it feels warm to the touch, but not boiling. Remove from the heat.
-
3. Place the bread flour in a large bowl or a large measuring cup with a spout. Using a fork or whisk, gradually beat in the warm milk, a little at a time, to prevent the batter from forming lumps. This gradual incorporation is crucial for a smooth batter. Let the flour and milk mixture stand at room temperature for at least an hour for proper hydration.
-
4. After the flour and milk mixture has been resting for about 15 minutes, adjust the oven rack to the lower third position and place a baking stone on it. Preheat the oven to a very hot 475°F (246°C). (If you suspect your oven runs cool, increase to 500°F (260°C) as high initial heat is essential for popovers).
-
5. After the flour and milk mixture has stood for over an hour, carefully place the popover pan in the preheated oven on the baking stone to heat thoroughly. This ensures the pan is piping hot when the batter goes in.
-
6. Separate 3 of the warmed eggs, saving the whites and storing the yolks for another use. Beat the remaining 2 whole eggs and the 3 egg whites together in a separate bowl. Then, beat in about 1/2 cup of the hydrated flour and milk mixture. Finally, beat this egg mixture into the remaining flour and milk mixture until well combined and smooth.
-
7. In the same saucepan you used for the milk, bring the heavy cream almost to a boil.
-
8. Sprinkle the salt over the batter and slowly whisk in the very warm cream. This final warming step before baking is critical for activating the steam.
-
9. Quickly pull the hot popover pan out of the oven. For ease, place the pan over the sink or on a heat-proof surface. Generously spray the cups of the popover pan with non-stick cooking spray and immediately pour the batter into the cups, filling each no more than 3/4 full. This 6-cup batch of filling should be exactly enough for a standard 6-cup popover pan. Promptly place the popover pan back on the hot stone in the oven and bake for 9 minutes. Do NOT open the oven door during this crucial initial rise.
-
10. Without opening the oven, turn down the heat to 425°F (218°C) and bake for 7 minutes more. Again, do NOT open the oven. Finally, turn down the oven to 325°F (162°C) and leave the popovers in the oven for 20 to 25 minutes more, or until they are fully risen, deeply golden, and dry to the touch, indicating a crisp exterior.
-
11. Gently invert or run a thin knife around the edges of the popovers to release them onto a wire rack to cool for a minute or so. Serve immediately with really good butter and your favorite preserves. (For convenience, these popovers can be made several hours ahead and gently rewarmed at 300°F (149°C) for 5 minutes. Alternatively, once completely cool, they can be sealed in heavy resealable freezer bags and frozen. Reheat from frozen in a 300°F (149°C) oven for about 5 minutes until crisp again.)
Tips for Achieving Popover Perfection
- Temperature is Everything: As Shirley Corriher emphasizes, ensuring all ingredients, the pan, and the oven are very warm is paramount. Cold batter will not rise as dramatically.
- Don’t Peek! Resist the urge to open the oven door during the first two baking stages. Any drop in temperature can cause the popovers to deflate, ruining their iconic height.
- Bread Flour vs. All-Purpose: While some all-purpose flours can work (as noted by a tester), bread flour’s higher protein content provides superior gluten development, which translates to a stronger structure capable of supporting that impressive “mile-high” puff.
- Grease Generously: A generous coating of non-stick spray in each cup of the popover pan helps the batter climb the sides, contributing to vertical rise and easy release.
- Listen for the Whistle: Properly baked popovers often have a slightly crisp, almost hollow sound when tapped, indicating they are fully cooked through and dry on the inside.
Serving Suggestions and Variations
Mile-high popovers are incredibly versatile, delightful on their own or as a canvas for various toppings. Serve them warm from the oven with a simple smear of salted butter and a dollop of fruit preserves for a classic sweet treat. For a savory twist, consider:
- Pairing them with roasted meats, much like Yorkshire puddings, to soak up rich gravies.
- Serving alongside a hearty stew or chili for a comforting meal.
- Filling them with scrambled eggs and cheese for a unique breakfast sandwich.
- Drizzling with honey or maple syrup for a sweeter breakfast or dessert.
- Sprinkling with fresh herbs like chives or thyme into the batter for an aromatic savory popover.
Adapted From
BakeWise
Buy On Amazon
Explore More with AI
Ingredient Substitutions (via AI)
Scale Recipe (via AI)
Summarize Recipe (via AI)
Note: AI-generated suggestions are based on general knowledge and may not have been tested with this specific recipe. Always use your best judgment.
Nutrition
Serving:
1
popover
Calories:
274
kcal
Carbohydrates:
30
g
Protein:
12
g
Fat:
11
g
Saturated Fat:
6
g
Monounsaturated Fat:
3
g
Trans Fat:
1
g
Cholesterol:
179
mg
Sodium:
382
mg
Fiber:
1
g
Sugar:
3
g
Nutrition information is automatically calculated, so should only be used as an approximation.
Tried this recipe?
Mention @leitesculinaria or tag #leitesculinaria!
Recipe Testers’ Reviews: Real Feedback for Real Popovers
Before any recipe earns a coveted spot, it undergoes rigorous testing by our dedicated team of home cooks. Their invaluable feedback ensures that every instruction is clear and every outcome is spectacular. Here’s what our testers had to say about Shirley Corriher’s Mile-High Popovers:
Elie Nassar
“These mile-high popovers are excellent. Period. They were perfectly pillowy, airy, full of huge bubbles, and boasted an exterior that was beautifully caramelized and crunchy, rising as tall as they possibly could. Mile-high popovers, indeed!
I genuinely have nothing to add to this recipe. If you follow it precisely as written, it will undoubtedly deliver the best popovers or Yorkshire puddings you could hope for, perfect for your next Sunday roast or holiday meal. I already know these will be a frequent staple in my kitchen.
For flour, I used my reliable King Arthur All-Purpose flour, and it performed wonderfully. So, there’s no urgent need to seek out a special type of flour, just be sure to avoid lighter options like cake or pastry flour. The timings were incredibly accurate; I followed them exactly and achieved fantastic results. As the recipe states, this batch makes just the right amount of batter for a 6-cup popover pan.”
Debbie Vargo
“I find the process of making popovers utterly magical, and I particularly love watching their transformation through the oven window. My friends and family often grow weary of my constant calls to ‘come and see this!’ during baking, but it truly is an amazing sight. While perhaps not quite a literal mile high, these popovers rise exceptionally well, and the use of bread flour provides excellent structural integrity, allowing them to truly expand and grow.
Shirley Corriher, whose insightful BakeWise book holds a prominent place on my shelf, consistently approaches her recipes with the precision of both a scientist and a seasoned cook. This recipe is no exception; the careful warming of all ingredients, as well as the pan itself, is ingeniously designed to achieve the maximum possible rise. We enjoyed them piping hot with butter at dinner, and they were absolutely delicious. The outer shell was wonderfully crisp, while the inside remained tender and steamy hot, perfectly melting all that added butter. Yum.”
Melissa D.
“This was my very first time attempting popovers, and I followed the recipe exactly as written, with just one minor adjustment. Lacking a dedicated popover pan, I opted to use a standard muffin tin instead. A 12-cup muffin pan worked perfectly, and there was enough batter to fill 10 cups. (I deliberately left the two middle cups empty to provide ample room for the popovers to rise without crowding.) The resulting texture was ideal—beautifully airy and wonderfully soft on the inside.
I adhered strictly to the given baking times, meticulously reducing the temperature first to 425°F and then to 325°F. My popovers took precisely 22 minutes at the 325°F setting to reach perfection. It was genuinely entertaining to observe them ‘pop’ right before my eyes through the oven window! Within minutes of taking them out of the oven, they were ready to eat. I even brought some to work the following day and reheated them briefly in a microwave, serving them with homemade peach butter. Everyone absolutely adored them!”
Conclusion: Your Journey to Popover Perfection Begins Here
Shirley Corriher’s Mile-High Popovers are more than just a recipe; they are an invitation to explore the delightful world where precise technique meets culinary magic. By embracing the simple yet impactful principles of baking science – especially the critical role of warmth and proper flour hydration – you’re not just baking, you’re engaging in a fascinating culinary experiment that yields consistently spectacular results. Whether served as an elegant side, a delightful breakfast, or a unique dessert, these popovers promise to be a memorable experience for anyone who tastes them. Don’t hesitate to embark on this rewarding baking adventure; you’ll be incredibly glad you did!