
Deep-frying is a culinary art that transforms simple ingredients into golden, crispy delights, offering an irresistible crunch and flavor that few other cooking methods can match. For many, the joy of a perfectly fried dish, whether it’s succulent fried chicken, crispy french fries, or a sweet, airy donut, is one of life’s true pleasures. While some home cooks might shy away from deep-frying due to perceived difficulty or safety concerns, it’s actually much simpler and more accessible than you might think. With the right knowledge, tools, and techniques, you can confidently create a bounty of crispy masterpieces in your own kitchen. This comprehensive guide will demystify the deep-frying process, helping you achieve all your crunchy culinary dreams with ease and safety.

What is Deep-Frying? An Essential Cooking Method
At its core, deep-frying is a popular cooking technique where food is fully submerged in hot oil or fat. This method rapidly cooks the food, creating a distinctively crispy, crunchy exterior while keeping the interior moist and tender. The high heat of the oil quickly evaporates moisture from the surface of the food, forming a delectable crust through the Maillard reaction, which is responsible for the rich, browned flavors and appealing aroma. Traditionally, rendered animal fats like lard were common, prized for their high smoke point and flavor. However, modern culinary practices predominantly favor plant-based oils due to their versatility, neutral flavor, and often healthier profiles. While specialized deep fryers are available, a robust, heavy-bottomed pot—such as a deep cast-iron Dutch oven or a heavy stockpot—can serve just as effectively, making deep-frying accessible to any home kitchen.
Choosing the Best Oil for Deep-Frying: Key Considerations
Selecting the right oil is paramount to successful deep-frying. The ideal frying oil balances three critical factors: a high smoke point, a mild or neutral flavor, and affordability. An oil with a high smoke point is essential because it can reach and maintain the high temperatures needed to cook food quickly and achieve that coveted crispiness without burning. If the oil isn’t hot enough, food will absorb too much oil, becoming greasy and soggy; if it’s too hot, the exterior will burn before the interior is properly cooked.
Furthermore, a mild-flavored oil is crucial to allow the natural taste of your food to shine through. Highly refined oils tend to have the least flavor, making them perfect for deep-frying. In contrast, richly flavored, unrefined oils, while wonderful for salad dressings or finishing dishes, possess strong flavors that would overpower and even degrade the taste of your fried items. For instance, extra virgin olive oil, despite its health benefits, has a low smoke point and distinct flavor that makes it unsuitable for deep-frying.
While many oils meet the smoke point and flavor criteria, the substantial volume needed for deep-frying often makes pricier options financially impractical. For example, some high-quality, refined olive oils could technically be used, but their cost would be prohibitive for most home cooks.
Considering all three factors—smoke point, mild flavor, and cost—several oils stand out as excellent choices. Peanut oil is a perennial favorite among chefs and home cooks for its outstanding performance in deep-frying; contrary to popular belief, refined peanut oil has a very subtle, almost undetectable nutty taste. Other highly recommended options include canola oil, vegetable oil, and refined sunflower and safflower oils. These oils are typically economical, widely available, and possess the necessary characteristics for superb frying results.
Beyond smoke point, another consideration is the oil’s stability at high temperatures. This refers to its ability to resist breakdown and oxidation when heated for extended periods. Refined and filtered oils are generally more stable and are preferred for deep-frying. Unfiltered oils contain tiny particles that can burn quickly at high temperatures, imparting undesirable flavors and accelerating oil degradation. Opting for a filtered oil ensures a cleaner, purer frying experience and helps extend the oil’s usability.
Understanding Smoke Point: The Critical Temperature for Frying
The smoke point of an oil is a crucial metric in cooking, particularly for high-heat methods like deep-frying. It represents the temperature at which a cooking fat—whether it’s lard, butter, or oil—stops shimmering and begins to visibly smoke. When oil starts to smoke, it signals several important changes. Firstly, it indicates that the chemical compounds within the oil are starting to break down. This process can lead to unpleasant, acrid, or burned flavors in your food, even before you’ve added any ingredients. The kitchen may also fill with an undesirable, lingering smell.
- **Chemical Breakdown and Flavor Impact:** Smoking oil means its fatty acids are oxidizing and breaking down into glycerol and free fatty acids, which further decompose into compounds like acrolein – a pungent, irritating chemical responsible for the sharp smell and bitter taste. This breakdown diminishes the oil’s quality and can introduce unhealthy compounds.
- **Proximity to Flash Point:** Smoking oil also signifies that it is approaching its flash point, the temperature at which ignitable gases begin to accumulate above the oil’s surface, posing a fire risk. If your oil starts smoking, there’s no need to panic, but immediate action is necessary. Gently remove the pot from the heat source and allow the oil to cool down. It’s also wise to open a window to ventilate your kitchen and clear any smoke or fumes. Once the oil has cooled completely, you can carefully taste a small amount. If it hasn’t developed a bitter or burned flavor, it may still be salvageable for further use, though its smoke point will have slightly decreased.
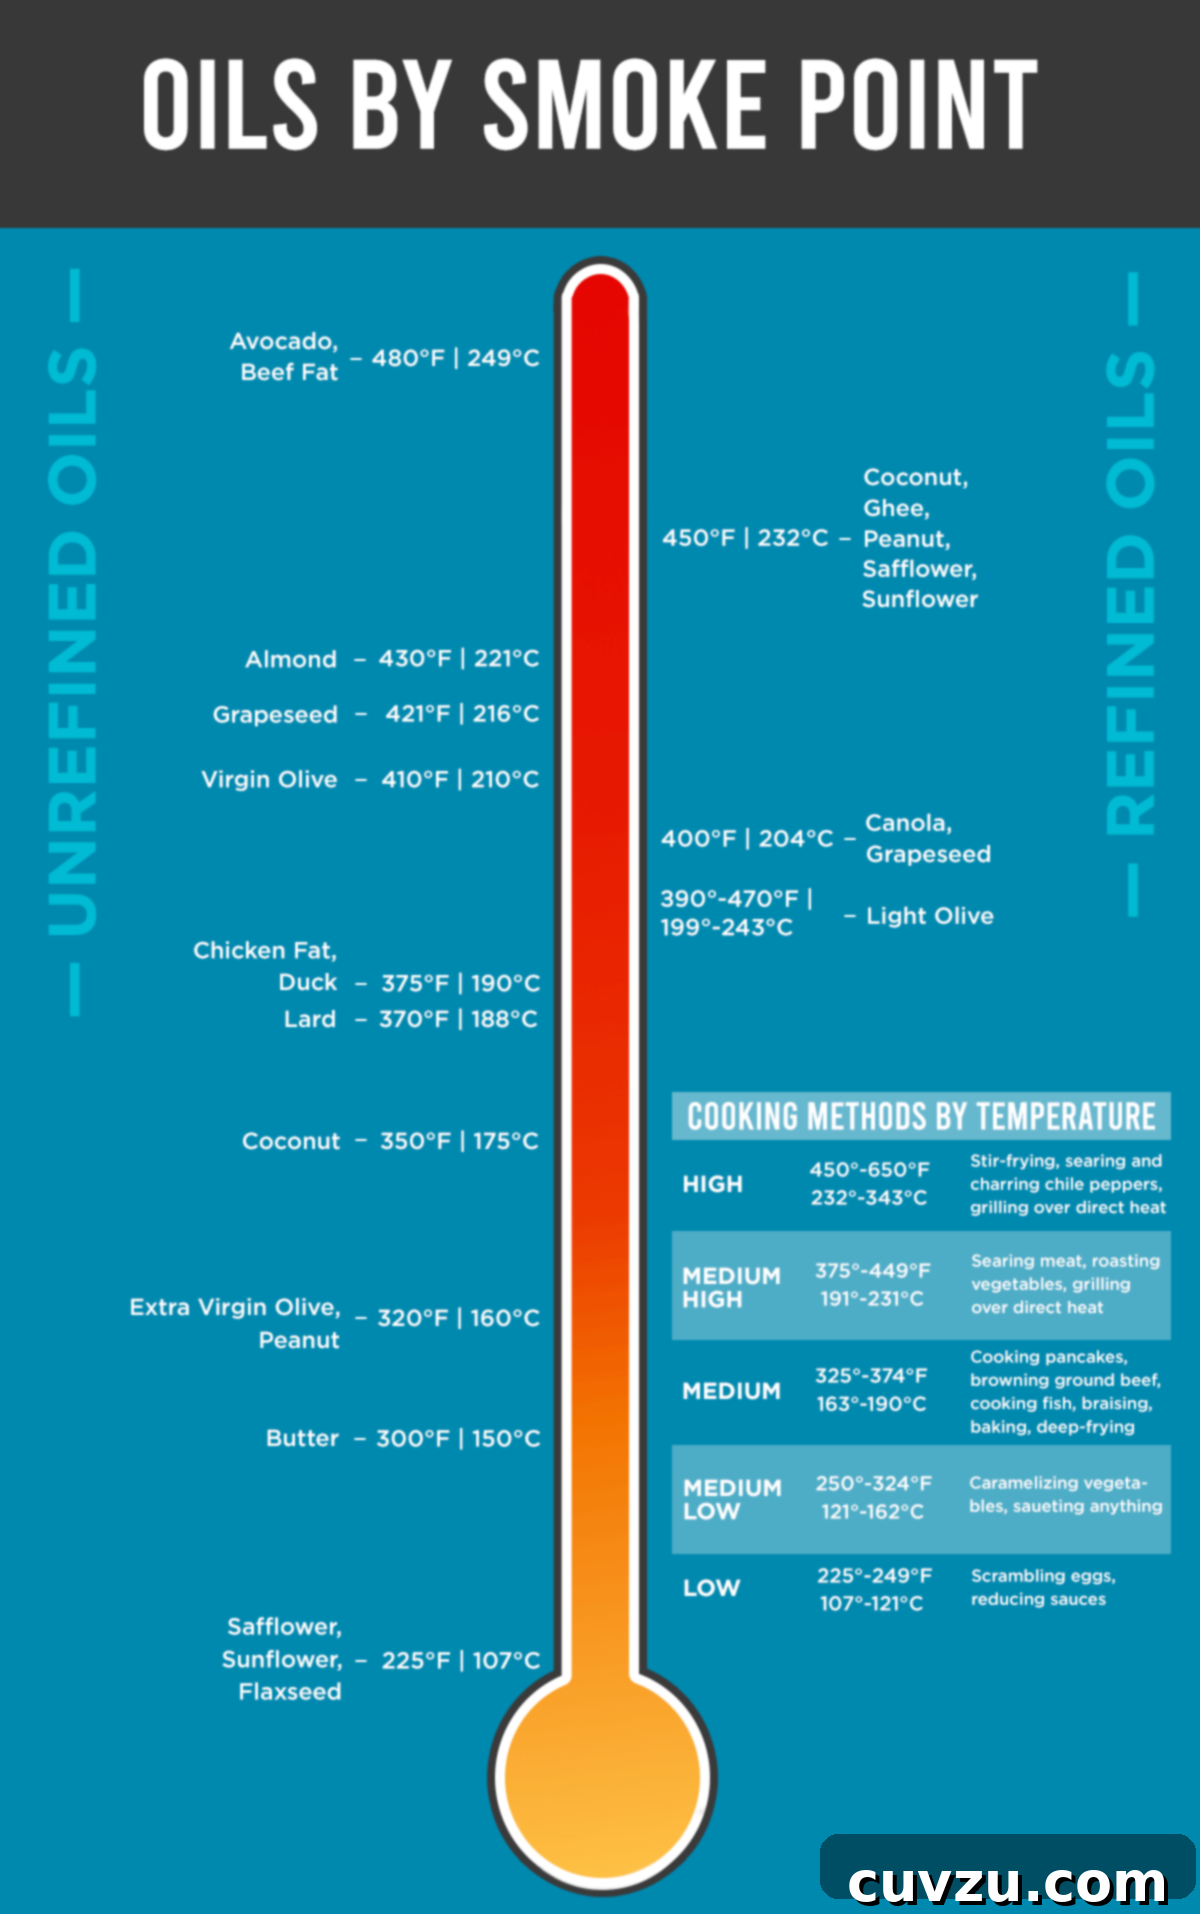
For safe and effective deep-frying, it is generally recommended to use highly stable oils with a smoke point of 400°F (205°C) or higher. These oils provide a comfortable buffer, allowing you to reach optimal frying temperatures without risking degradation or fire. For a detailed reference of various oil smoke points, you can explore comprehensive lists that help inform your choices based on cooking needs.
Ensuring Optimal Oil Temperature for Perfect Deep-Frying
Maintaining the correct oil temperature is perhaps the most critical factor for achieving perfectly fried food. Incorrect temperatures lead to a host of problems that can ruin your dish. If the oil is too hot, the exterior of your food will quickly burn to a crisp, often turning dark brown or black, while the inside remains raw or undercooked. Conversely, if the oil isn’t hot enough, the food will absorb excessive amounts of oil, resulting in a greasy, heavy, and unappetizingly soggy texture—a culinary disappointment no one wants. As the adage goes, “Hot oil seals, warm oil soaks.”
It’s important to remember that timing in recipes serves as a guideline, not an absolute rule. Many variables can significantly impact the actual frying time and oil temperature. For instance, crowding the pot with too much food at once, or introducing cold items into the hot oil, will cause a rapid and significant drop in the oil’s temperature. This temperature fluctuation prolongs cooking time and can lead to unevenly cooked or greasy results. To mitigate this, always fry in small batches, allowing the oil temperature to recover between additions.
For anyone serious about deep-frying regularly, investing in a reliable deep-fry thermometer is indispensable. This tool eliminates guesswork, making the process safer, more consistent, and ultimately more successful. Deep-fry thermometers, available in various styles and price points, typically clip onto the side of your pot, providing continuous and accurate temperature readings. This precision ensures your oil is always at the ideal temperature, guaranteeing consistently crispy, golden, and thoroughly cooked food every time.
Deep-Frying Without a Thermometer: Quick Checks and Limitations
While a deep-fry thermometer is highly recommended for accuracy and safety, there are a few traditional “hacks” you can use if you find yourself in a pinch without one. These methods offer a rough estimate of your oil’s temperature, but it’s crucial to understand they are not as precise or reliable as a dedicated thermometer.
One common technique is the bread cube test. Drop a small, one-inch cube of bread into the hot oil. If the oil is between 325 and 350℉ (162 and 177°C)—an ideal range for many fried foods—the bread cube should turn golden brown and crispy within a few seconds (approximately 30-60 seconds). A similar test can be performed with a single kernel of unpopped popcorn; if it pops quickly, your oil is likely hot enough for frying. However, if the bread browns almost instantly, the oil is too hot and needs to cool slightly. Conversely, if it takes longer than a minute to brown, the oil is not hot enough.
Another popular method involves dipping the handle of a wooden spoon or a dry chopstick into the hot oil. If tiny bubbles immediately form around the wood and begin to rise quickly to the surface, your oil is likely ready for frying. If the oil is bubbling vigorously and aggressively, it’s probably too hot and requires a few moments to cool down. If no bubbles appear, the oil is definitely not hot enough. While these visual cues can be helpful, they lack the precision of a thermometer. For best results, especially with more delicate or temperature-sensitive foods, acquiring a proper deep-fry thermometer is always the most reliable approach.
Determining Doneness for Deep-Fried Foods
Knowing precisely when your deep-fried food is ready is crucial for both safety and taste. While visual cues like a golden-brown exterior are important, relying solely on them can be misleading, especially for thicker items. For internal doneness, particularly with meats, a digital instant-read thermometer is your best ally. Unlike a deep-fry thermometer that monitors oil temperature, an instant-read thermometer measures the internal temperature of the food itself.
For chicken, for example, the internal temperature should reach at least 165℉ (74℃) to be safely cooked through. Other meats like pork often require similar temperatures. For fish, the flesh should be opaque and flake easily. Delicate items such as the fried avocado dippers mentioned earlier, or thinly sliced vegetables, cook much faster, and don’t typically require an internal temperature check, but rather depend on visual crispness. When checking meat, insert the thermometer into the thickest part, avoiding bones. If the juices run clear when pierced, it’s often a good sign of doneness, but the thermometer provides definitive proof. Always allow fried foods to rest briefly after cooking to allow the internal temperature to equalize and juices to redistribute, ensuring a more tender and flavorful result.
Reusing Cooking Oil: Practical Tips and Considerations
Yes, you can absolutely reuse cooking oil after deep-frying, but there are important caveats to ensure both quality and safety. The primary factor influencing reusability is what you fried in it. Oils used for strongly flavored foods, such as Southern fried catfish or heavily spiced items, will impart those flavors to subsequent dishes. You wouldn’t want to fry delicate mini funnel cakes in oil that previously held strongly flavored fish, for example. Therefore, it’s often a good practice to keep separate batches of oil for different types of foods—one for savory items, another for sweeter, more neutral-flavored fare.
Keep in mind that with each use, the smoke point of your oil gradually degrades. This means that the oil will reach its smoking point at a lower temperature than before, leading to a bitter taste and a smoky kitchen more quickly. The presence of food particles, moisture, and exposure to oxygen and heat all contribute to the breakdown of the oil’s chemical structure. If your next recipe doesn’t demand extremely high temperatures, or if the oil was used for a very short duration, you might get another successful use out of it. Generally, oil can be reused about 3-4 times for light frying, and perhaps fewer times for heavier or strongly flavored foods.
The key to maximizing oil reuse is thorough straining. All those tiny crumbs, batter bits, and food particles left over from the last frying session are catalysts for oil degradation. They will burn rapidly during subsequent heating, accelerating the breakdown of the oil and imparting a burned, acrid taste to your fresh food. Proper straining after each use is non-negotiable for preserving the oil’s quality and extending its life.
Properly Straining and Storing Deep-Frying Oil
After enjoying your perfectly fried dishes, the next crucial step is to properly strain and store your cooking oil. First and foremost, allow the oil to cool completely. This means waiting for several hours, or even overnight, until it reaches room temperature. Oil burns are excruciatingly painful and can cause severe injury, so always prioritize safety by ensuring the oil is absolutely cool before you attempt to handle the pot. Rushing this step is a common mistake that can lead to dangerous spills.
Once cooled, prepare your straining setup. Line a fine-mesh strainer with several layers of cheesecloth or, for even finer filtration, a paper coffee filter. Place this over a large, clean measuring cup or another suitable container. Carefully pour the cooled oil through the lined strainer, allowing all the sediment and food particles to be captured. This meticulous straining process is vital because those tiny residual particles accelerate oil degradation and will burn in subsequent uses, imparting off-flavors to your food.
After straining, use a funnel to transfer the clean oil into an appropriate, airtight storage container. A glass jar with a tight-fitting lid works well, or you can even use the original oil container if it’s clean and resealable. Store the container of oil in a cool, dark place, such as your refrigerator or pantry. Refrigeration can further extend the oil’s shelf life, particularly for oils used infrequently. Keeping it away from light and heat minimizes oxidation and helps preserve its freshness.
Finally, when the oil has been reused a few times, or if it develops a rancid smell, dark color, or cloudy appearance, it’s time for disposal. The most responsible way to dispose of used cooking oil is to pour it back into a resealable container (like its original bottle or an empty milk carton) and discard it in the trash. **Never pour cooking oil down the drain**, as it can solidify and cause severe plumbing blockages, leading to costly repairs. As an environmentally conscious alternative, seek out local facilities that recycle cooking oil in your area. Many communities have specific drop-off points or programs for this purpose, turning waste into a valuable resource and earning you “bonus karma points.”
Essential Tools for Successful Deep-Frying at Home
While deep-frying might conjure images of elaborate restaurant equipment, most home cooks can achieve excellent results with a few key, practical tools. There’s no need for a bulky, hard-to-clean commercial deep-fryer for occasional home use.
1. **A Heavy, Deep Pot:** This is your primary piece of equipment. We recommend investing in a heavy-bottomed, relatively deep pot with a capacity of 4 to 6 quarts. Materials like cast iron or heavy-gauge stainless steel are ideal because they retain heat exceptionally well, which is crucial for maintaining a consistent oil temperature when food is added. A light-colored enamel interior can also be beneficial as it makes it easier to monitor the browning of food and the clarity of the oil, preventing overcooking.
2. **Reliable Thermometer:** As emphasized, a thermometer is absolutely essential. You need one that can accurately register temperatures at least from 350°F to 400℉ (177°C to 204°C). Deep-fry thermometers typically feature a clip to attach securely to the side of the pot, keeping the probe submerged without touching the bottom. An accurate probe thermometer can also work, but ensure it’s safely positioned and won’t fall into the hot oil.
3. **Metal Skimmer or Spider:** This tool is indispensable for safely lowering food into the hot oil and, more importantly, for retrieving those perfectly golden-brown pieces. A metal skimmer, often resembling a shallow basket with a long handle, allows oil to drain quickly. A spider, with its web-like mesh, serves a similar purpose. While some cooks prefer tongs for a more tactile experience, having both a skimmer/spider and a pair of long-handled tongs provides maximum versatility for different food types and ensures safety.
4. **Metal Rack and Sheet Pan:** Draining fried foods directly on paper towels might seem convenient, but it can lead to soggy results. The steam trapped between the hot, crispy crust and the paper towel condenses, making the bottom of your food soft and disappointing. Instead, place a metal wire rack over a sheet pan. This setup allows for optimal air circulation around the fried items, preserving their crispness. Line the sheet pan with paper towels or foil to catch any excess oil, making cleanup significantly easier. A good rule of thumb: whatever reduces post-frying chores is a win!
5. **Splatter Shield (Optional but Recommended):** A splatter shield is a mesh screen that fits over your pot, helping to contain oil splashes and keep your stovetop and surrounding areas cleaner. While not strictly mandatory, especially for experienced cooks who manage splatters well, it can be a valuable addition for beginners or when frying particularly moist foods. Some cooks find removing and replacing it disruptive, so it often comes down to personal preference and comfort level.
Equipping yourself with these basic yet effective tools will elevate your deep-frying experience, making it safer, cleaner, and much more consistently rewarding.
Essential Deep-Frying Safety: A Non-Negotiable Guide
Deep-frying involves working with very hot oil, so safety must always be your top priority. Adhering to these guidelines, regardless of your experience level, will help prevent accidents and ensure a smooth, enjoyable frying process.
- **Respond to Smoking Oil Immediately:** If your oil begins to smoke, it means it’s overheating and nearing its flash point. Immediately turn off the heat source (gas burner or electric element) and carefully slide the pot off the burner. Allow the oil to cool completely before handling it further. Never leave smoking oil unattended.
- **Use the Right Pot and Fill Level:** Always use a large, wide, and sturdy pot with high sides, such as a Dutch oven or stockpot. Never fill the pot more than two-thirds full with oil. This critical safety measure provides ample headspace to prevent the oil from boiling over or splattering dangerously when food is added, or if it suddenly expands due to moisture.
- **Keep a Lid Handy:** Always have a tight-fitting lid for your pot within arm’s reach. In the unlikely event that the oil overheats and catches fire, carefully sliding the lid onto the pot will cut off the oxygen supply to the flames, extinguishing the fire. Alternatively, salt and baking soda can help smother small grease fires, as can a fire blanket or a Class K fire extinguisher (specifically designed for cooking oil fires).
- **NEVER Use Water on an Oil Fire:** This is a crucial rule. Water causes hot oil to instantly vaporize and violently expand, spreading the burning oil and intensifying the fire dramatically. Similarly, never use flour, as it is combustible and can also explode or worsen the situation.
- **Position Pot Handles Safely:** Always turn pot handles toward the back or side of the stove, away from the front edge of the counter and away from where people might brush against them. This prevents accidental knocking over, which can lead to severe burns from spilled hot oil.
- **Ensure Food is Dry:** Water and hot oil are an extremely dangerous combination. Any moisture on food, especially items without batter like French fries, onion rings, or chicken wings, will cause the oil to violently splatter and pop. Always pat food thoroughly dry with paper towels before carefully lowering it into the hot oil.
- **Never Leave Hot Oil Unattended:** Hot oil heats up quickly and can go from simmering to smoking to catching fire in a matter of moments. Always stay in the kitchen and keep a close eye on the oil temperature and the food while frying. Distractions can lead to serious accidents.